This is a custom Proteus simulation model for the popular DFRobot Gravity: Analog UV Sensor. It provides a clean linear analog voltage output that rises proportionally with increasing UV intensity, starting near 0 V for low or no UV and reaching up to around 1 V at a UV Index of 10 under typical 5 V operation.
Proteus UV Sensor Simulation Model
The model captures the essential characteristics of the actual sensor, including:
- A linear analog response where the output voltage scales roughly 0.1 V per UV Index unit, making it straightforward to map readings to standard UV Index values (0–10 normal range, with warnings for 11+ extreme levels).
- Easy three-wire hookup using VCC, GND, and the signal pin, compatible with any microcontroller’s analog input.
This model joins our growing collection of DFRobot Gravity sensor simulations, designed to help students, hobbyists, and engineers prototype ideas quickly and reliably. Previous releases include Ambient Light Sensor, Digital Shake/Vibration Sensor, Water Pressure Sensor, Liquid Level Sensor, Oxygen Sensor, Air Quality Sensor, and more. Each one mimics real hardware behavior closely, so you can develop and debug Arduino code or entire systems in Proteus before touching physical parts, saving time, reducing trial-and-error, and making experimentation more accessible.
How to use UV Sensor with Arduino
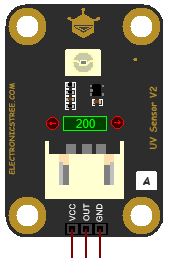
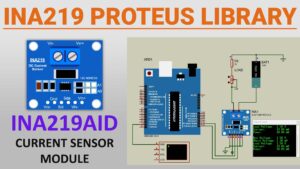
Connecting and using the UV sensor model in Proteus is straightforward and mirrors real hardware setup.
- Connect VCC to the 5V Terminal.
- Connect GND to the GND Terminal.
- Connect the OUT pin to any Arduino analog pin, such as A0.
analogRead() to capture the 0–1023 value from the Arduino’s 10-bit ADC. The voltage scales predictably, allowing you to calculate the UV Index directly (for example, UV Index ≈ voltage × 10, with minor adjustments for noise or calibration). This makes it easy to implement features like displaying the current UV level, triggering notifications when exposure becomes high, or logging data over time, all testable right in simulation.Arduino Code
const int uvPin = A5;
int rawValue = 0;
int uvIndex = 0;

void setup() {
  Serial.begin(9600);
  Serial.println("UV Sensor Monitor Ready");
}

void loop() {
  rawValue = analogRead(uvPin);
  float voltage = rawValue * (5.0 / 1023.0);

  if (rawValue < 10) {
    uvIndex = 0;
  } else {
    uvIndex = round(voltage * 10);
  }

  Serial.print("Raw Value: ");
  Serial.print(rawValue);
  Serial.print("  |  Voltage: ");
  Serial.print(voltage, 2);
  Serial.print("V  |  UV Index: ");

  if (uvIndex > 10) {
    Serial.println("11+ EXTREME UV! Limit exposure and seek shade.");
  } else {
    Serial.println(uvIndex);
  }

  delay(1000);
}
Download Library
Simply click on the button to download the library. You can refer to this post for instructions on how to install the library in Proteus 8. How to Download and install Library in Proteus (electronicstree.com)
ZIP Password : electronicstree.com
We’re always looking to expand our library collection based on what our community needs. If you’re looking for a specific Arduino module, sensor, or component that we don’t currently offer, we’d love to hear from you!
Reach out to us at help@electronicstree.com with your requests. We prioritize new library development based on community demand, so your suggestion could be our next addition.
Join the official WhatsApp channel of ElectronicsTree to stay updated with the latest electronics tutorials, Proteus libraries, Arduino projects, and simulation resources.
