What is a Sound Sensor
A sound sensor, also known as a sound detector module, is an electronic device that can detect sound waves and convert them into electrical signals. These sensors are commonly used in various applications such as security systems, home automation, robotics, and environmental monitoring. In this post, I’ll discuss the construction, working principle, and how to use a sound sensor with Arduino.
Construction
Diaphragm:
The core component of a sound sensor is a diaphragm, typically made of a thin material like plastic or metal. This diaphragm is sensitive to air pressure variations caused by sound waves.
Coil or Piezoelectric Material:
The diaphragm is often connected to a coil or a piezoelectric material. In the case of a dynamic microphone, the coil is placed within the magnetic field of a magnet. When the diaphragm moves in response to sound waves, the coil moves within the magnetic field, generating an electrical current.
Capacitor (Electret Microphone):
In electret microphones, there is a charged capacitor attached to the diaphragm. When the diaphragm vibrates due to sound waves, the distance between the diaphragm and the capacitor changes, causing a variation in capacitance. This change in capacitance is converted into an electrical signal.
Pre-amplifier (Optional):
The electrical signal generated by the diaphragm or capacitor may be weak, so some sound sensors include a pre-amplifier to boost the signal strength.
Working Principle
Sound Waves Detection:
When sound waves reach the diaphragm of the microphone, they cause the diaphragm to vibrate.
Conversion to Electrical Signal:
In dynamic microphones, the movement of the diaphragm within the magnetic field generates an electrical current. In electret microphones, the change in capacitance due to diaphragm movement results in an electrical signal.
Amplification:
The generated electrical signal may be amplified using a pre-amplifier to ensure it is strong enough for further processing.
Output Generation:
The final electrical signal represents the variations in air pressure caused by sound waves and can be used as an input signal for various applications such as audio recording, noise measurement, or automation systems.
Using a Sound Sensor with Arduino:
There are two main types of sound sensors that you can use with Arduino: analog and digital.
Analog sound sensors
Analog Sound Sensors output a voltage that is proportional to the loudness of the sound. You can use an analog-to-digital converter (ADC) on your Arduino to read this voltage and then use it to control something, like an LED or a speaker.
Digital sound sensors
Digital sound sensors output a high or low signal depending on whether or not a sound is above a certain threshold. These are simpler to use than analog sound sensors, but they are not as versatile.
Gather your materials.
You will need an Arduino, a sound sensor, a breadboard, some jumper wires, and an LED (optional).
Connect to the Arduino.
The connections will vary depending on the type of sound sensor you are using. For most analog sound sensors, you will connect the ground pin to the Arduino’s ground pin, the power pin to the Arduino’s 5V pin, and the output pin to an analog input pin on the Arduino. For most digital sound sensors, you will connect the ground pin to the Arduino’s ground pin, the power pin to the Arduino’s 5V pin, and the output pin to a digital input pin on the Arduino.
Write the Arduino code.
The code will vary depending on what you want the sound sensor to do. Here is a simple example of code that will read the value of an analog sound sensor and turn on an LEDs according to the sound level.
Upload the code to the Arduino and test it.
Once the code is uploaded, you should be able to see the LEDs turn on when you make a loud noise.
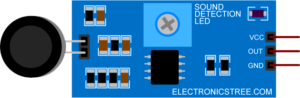
Simulation with Proteus
Proteus VSM provides a dynamic library for sound simulation within Proteus. This library allows simulation of sound through input from a PC. The sound sensor captures audio input from a PC, such as from your headphone’s microphone or any other microphone. I have customized the graphics and redesigned the shape of the sound module. With this module, you can effortlessly simulate various sounds. I have incorporated an LED animation on the module that will indicate the sound detection status accordingly.
Here is the sound simulation in Proteus.

Download Library
Simply click on the button to download the library. You can refer to this post for instructions on how to install the library in Proteus 8. How to Download and install Library in Proteus (electronicstree.com)
ZIP Password : electronicstree.com
If you have any requests for Arduino Module Libraries in Proteus, please leave a comment or message us using the contact form.


hello, this module not work in the Proteus. please help me
This library enables the simulation of sound through input from a PC’s audio. The sound sensor captures audio input from the PC, such as from your microphone. Simply attach a microphone, speak, and observe the output.
Hi, The device work, but the monitor serial always send 0
Can you tell me how you are using it, directly with the Serial Monitor or with Arduino?