Hey everyone! Just wanted to share something I’ve been working on, a UART Non-contact Optical Turbidity Sensor Library for Proteus. It lets you simulate how an optical turbidity sensor behaves in different water clarity conditions, all inside Proteus, without needing any physical parts. Super handy for testing your circuit’s response to cloudy or clear water before you even touch the hardware. I built it to be easy to use and as close to the real thing as possible, so you can focus more on designing and less on guessing.
UART Non-contact Optical Turbidity Sensor
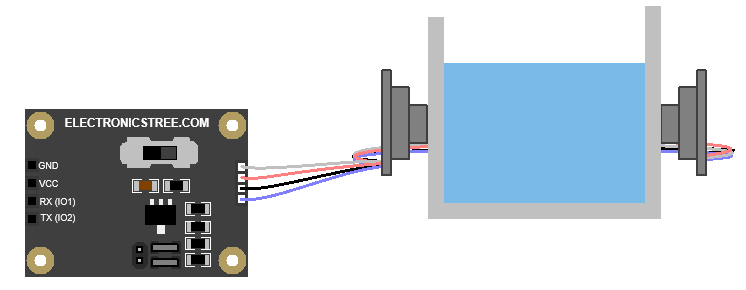
The non-contact turbidity sensor is designed to measure water quality by detecting how clear or cloudy the water is. It works on a basic optical principle, measuring how much light passes through or scatters in the liquid. It’s made for use with transparent cylinder containers, typically around 40 to 50 mm in diameter. The sensor gives an analog output that changes depending on the turbidity level, so the cloudier the water, the higher or lower the reading, depending on the setup.
This non-contact optical turbidity sensor model is inspired by similar modules often found from manufacturers like DFRobot. As I mentioned earlier, I’ve been working on simulation models for both analog and digital sensors, drawing inspiration from various available modules.
This is another addition to that series. Previously, I created simulation models for the Water Pressure Sensor, Digital Shake Sensor and the Liquid Level Sensor, so be sure to check those out as well if you haven’t already.
Proteus Model
There’s another version of the turbidity sensor available, an analog model. However, this particular sensor uses UART communication. It communicates via a TTL serial interface with a baud rate of 9600, 8 data bits, no parity, and 1 stop bit. The simulation model operates at 5V and responds quickly, typically within one second.
Communication Protocol
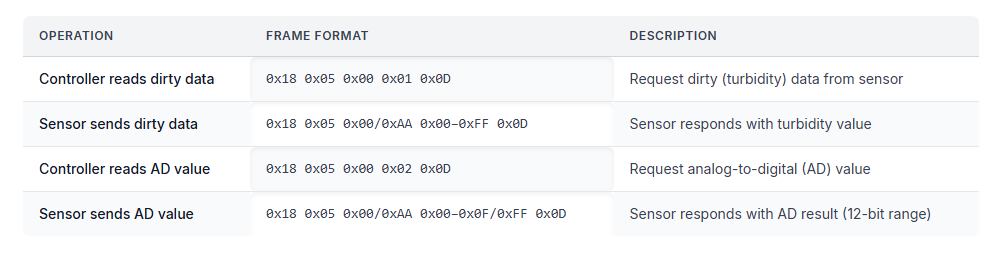
The UART Non-contact Turbidity Sensor follows a straightforward communication protocol between the controller (master) and the sensor (slave). Data is exchanged in a fixed frame format that includes a frame header, data length, command or response, and a frame trailer. For example, when the controller requests dirty data, it sends the frame 0x18 0x05 0x00 0x01 0x0D. The sensor responds with a similar frame, such as 0x18 0x05 0x00/0xAA 0x00–0xFF 0x0D, depending on the response type. The same structure is used for reading AD values, with the controller sending 0x18 0x05 0x00 0x02 0x0D and the sensor replying accordingly.
Calibration is also handled through specific command frames, but I didn’t include that in this model.
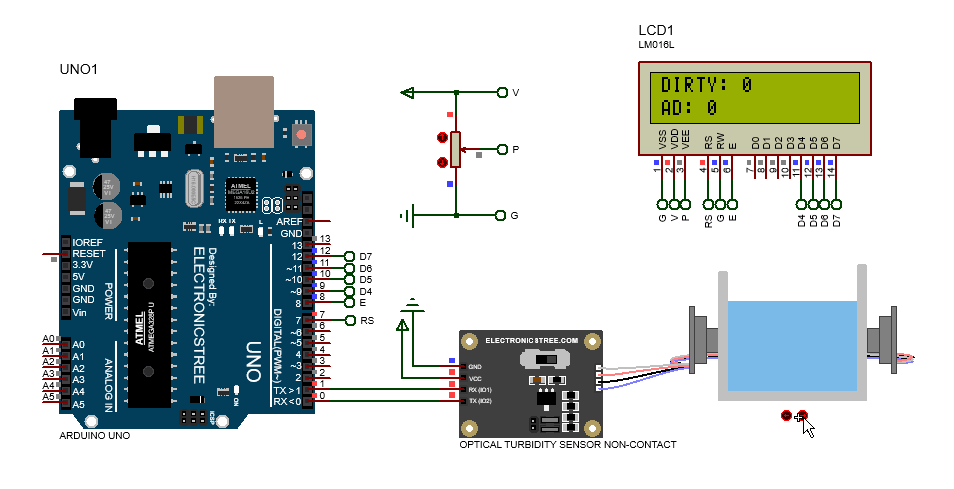
Connecting the Sensor with Arduino in Proteus
Connect the GND and VCC pins to their respective power rails. The TX and RX pins should be connected to the Arduino’s TX and RX pins accordingly.
Arduino Code
This Arduino code sends commands to the sensor to:
- Get the “dirty” value (basic turbidity)
- Get the “AD value” (a more precise analog-to-digital reading)
The sensor responds with specific data frames, which the Arduino parses and then displays on the LCD.
Mapping Raw Sensor Values to NTU Output
To convert this raw value into a real-world unit like NTU (Nephelometric Turbidity Units), we use mapping. NTU is a standardized unit used to quantify turbidity in water quality measurements.
We’re using the “dirty” value, which ranges from 0 to 255. This value gives a rough indication of the turbidity level, how cloudy or dirty the water is, based on how much light is scattered or absorbed.

Download Library
Simply click on the button to download the library. You can refer to this post for instructions on how to install the library in Proteus 8. How to Download and install Library in Proteus (electronicstree.com)
ZIP Password : electronicstree.com
If you have any requests for Arduino Module Libraries in Proteus, please leave a comment or message us using the contact form.
Fixing the “External model DLL not found (GLE=0x0000007E)” Error
If you start a simulation and see an error message such as:
or something similar with another DLL name, don’t panic. In most cases the DLL is not really missing. What’s happening is that your system doesn’t have the Visual C++ runtime libraries that the DLL needs in order to run.
The solution is simple. Go to Microsoft’s website and download the latest Visual C++ Redistributable for Visual Studio 2015–2022. You can find it here:
During installation, make sure you install both the x86 (32-bit) and x64 (64-bit) versions. Even on a 64-bit system, some applications depend on the 32-bit runtime, so having both installed avoids errors.
Once the installation is complete, restart your computer. After restarting, try running the simulation again. In most cases the error will disappear and everything will work normally.