Air quality affects our health, our environment, and our daily lives, and one of the key culprits behind poor air quality is particulate matter, tiny particles floating in the air that can harm us when breathed in. Imagine walking through a bustling city or near a construction site, where dust, smoke, or exhaust fills the air. These particles, some so small they’re invisible, are what PM air quality sensors are designed to detect. By measuring these particles, sensors help us understand how clean or polluted the air is, guiding actions to protect our health or meet environmental standards.
In this blog post, I’ll explain what PM air quality sensors are, break down the key ideas behind them in a way that’s easy to grasp, and then guide you through using the Gravity PM2.5 Air Quality Sensor simulation model in the Proteus. This simulation model lets you test air quality measurements virtually, and it now includes a feature where you can set the temperature directly in degrees Celsius, making it more realistic and user-friendly.
What Are PM Air Quality Sensors?
Let’s start with the basics of PM air quality sensors. These devices measure the amount of particulate matter, or PM, in the air. Particulate matter is made up of tiny solid or liquid particles, like dust, soot, or smoke, that float around us. They’re classified by size: PM1.0 includes particles 1.0 micrometer or smaller, PM2.5 covers particles up to 2.5 micrometers, and PM10 includes everything up to 10 micrometers.
Smaller particles, like PM2.5, are especially concerning because they can slip deep into our lungs or even enter our bloodstream, potentially causing respiratory issues or heart problems. These particles come from all sorts of places like, car exhausts, factory emissions, wildfires, or even natural dust kicked up by the wind. A PM sensor’s job is to tell us how much of this stuff is in the air, measured in micrograms per cubic meter. For example, a PM2.5 reading of 45 micrograms per cubic meter means there’s 45 micrograms of those tiny particles in every cubic meter of air you’re breathing.
How a PM Air Quality Sensor Works
So, how do these PM air quality sensors actually work? Picture a small device with a chamber inside where air is pulled in. A laser or light source shines through that air, and when it hits particles, the light scatters. The sensor analyzes this scattered light to figure out the size and number of particles, then calculates their concentration. It can report concentrations in two ways: standard, which is like a baseline measurement taken in a controlled lab setting, and atmospheric, which adjusts for real-world conditions like humidity or temperature.
For instance, a standard PM2.5 reading of 45 micrograms per cubic meter might drop to around 38 in atmospheric mode after accounting for environmental factors. Sensors also count particles in specific size ranges, like 0.3 or 2.5 micrometers, giving a detailed picture of what’s in the air. This data is sent out through a communication system, like a digital interface, so it can be used in air purifiers, weather stations, or research tools.
Introducing the Gravity PM2.5 Air Quality Sensor Simulation Model
Now, let’s dive into the Gravity PM2.5 Air Quality Sensor simulation model, designed for the Proteus VSM. This model mimics a real PM sensor, letting you experiment with air quality measurements in a virtual environment. It’s like having a digital version of the sensor that you can tweak to see how it behaves under different conditions. One of its standout features is its ability to provide two types of concentration measurements.

Standard mode gives you the raw, lab-like measurements for PM1.0, PM2.5, and PM10, ranging from 0 to 1000 micrograms per cubic meter. Atmospheric mode goes further, adjusting these measurements to reflect real-world factors like humidity and temperature, which can change how much particulate matter the sensor detects. For example, a standard PM2.5 reading of 45 micrograms per cubic meter might adjust to around 38 in atmospheric mode, depending on your settings.
Particle Count Generation
Another key feature is the model’s ability to generate particle counts. It calculates the number of particles in six size categories, from 0.3 micrometers to 10 micrometers, with counts ranging from 0 to 20,000 per 0.1 liters of air. These counts are based on the atmospheric concentrations, and to make the data feel realistic, the model adds a small random variation of plus or minus 5 counts. So, if the atmospheric PM2.5 is 38 micrograms per cubic meter, you might see around 1370 particles in the 0.3-micrometer bin. This feature helps simulate the natural variability you’d expect from a real sensor.
Environmental Adjustments in the Model
The PM air quality sensor also lets you adjust environmental factors to see how they affect measurements. Humidity, for instance, makes particles heavier by adding water, which increases the concentration readings. You can set humidity to low, medium, or high levels, which might boost concentrations by 2%, 5%, or 8%, respectively. Temperature, on the other hand, reduces concentrations because warmer air is less dense, meaning fewer particles per unit volume.
The model lets you set the temperature directly in degrees Celsius, from -10 to 60, matching the real sensor’s operating range. At -10°C, the air is denser, so there’s no reduction in concentration. At 25°C, you’ll see about a 2.5% drop, and at 60°C, the maximum reduction is around 5%, reflecting how air density changes across this range. This makes it easier to test realistic scenarios, like how the sensor might perform on a freezing winter day versus a hot summer afternoon.
Flexible Scaling and Power Modes
You can also choose whether to apply scaling factors, which mimic the calibration differences between lab and real-world conditions. When scaling is enabled, the model reduces standard concentrations, for example, a PM2.5 scaling factor of 0.85 might lower 45 micrograms per cubic meter to around 38. If you turn scaling off, only humidity and temperature adjustments apply, giving you flexibility to simulate different sensor behaviors.
PM air quality sensor operates in two power modes: active mode updates measurements every millisecond, while low-power mode pauses updates to mimic energy-saving operation. All these measurements, concentrations and particle counts, are stored in registers, making them accessible for virtual systems you might be designing.
Air Quality Sensor Configuration Properties
The Gravity PM2.5 Air Quality Sensor model is configured via the following properties:
- Scaling Enabled Enables (“YES”) or disables (“NO”) atmospheric scaling factors to simulate calibration differences between standard and real-world conditions.
- Humidity Sets humidity effect as “LOW” (+2%), “MEDIUM” (+5%), or “HIGH” (+8%), increasing atmospheric concentrations by absorbing water onto particles.
- Temperature Defines operating temperature in °C; reduces atmospheric concentrations based on air density (0% at -10°C, ~2.5% at 25°C, up to 5% at 60°C).
- PM1.0 Scale Value (Range: 0.5–1.0): Scaling factor applied to PM1.0 standard values in atmospheric mode when scaling is enabled.
- PM2.5 Scale Value (Range: 0.5–1.0): Scaling factor applied to PM2.5 standard values in atmospheric mode when scaling is enabled.
- PM10 Scale Value (Range: 0.5–1.0): Scaling factor applied to PM10 standard values in atmospheric mode when scaling is enabled.
Proteus Simulation

Install the Library
The sensor uses I2C, and DFRobot has a nice library to make things easy.
- Open Arduino IDE.
- Go to Sketch > Include Library > Manage Libraries.
- In the search box, type DFRobot_AirQualitySensor.
Alternatively, download from: https://github.com/DFRobot/DFRobot_AirQualitySensor
Wiring (I²C interface)
| Sensor Pin | Arduino Uno / Nano / Mega |
|---|---|
| VCC (+) | 5 V (or 3.3 V) |
| GND (-) | GND |
| SCL (C) | A5 (Uno) / SCL pin |
| SDA (D) | A4 (Uno) / SDA pin |
Arduino Code
#include "DFRobot_AirQualitySensor.h"
//(Address 0x19)
DFRobot_AirQualitySensor pmSensor(&Wire, 0x19);
void setup() {
Serial.begin(9600);
Serial.println(F("\n=== Gravity PM2.5 Sensor Initialisation ==="));
uint8_t attempts = 0;
while (!pmSensor.begin()) {
Serial.println(F("Sensor not detected. Check wiring / I²C address."));
delay(1000);
if (++attempts >= 5) {
Serial.println(F("Giving up. Halting."));
while (true) { delay(1000); }
}
}
Serial.println(F("Sensor initialised successfully."));
uint8_t version = pmSensor.gainVersion();
Serial.print(F("Firmware version: "));
Serial.println(version);
Serial.println();
delay(1000);
}
void loop() {
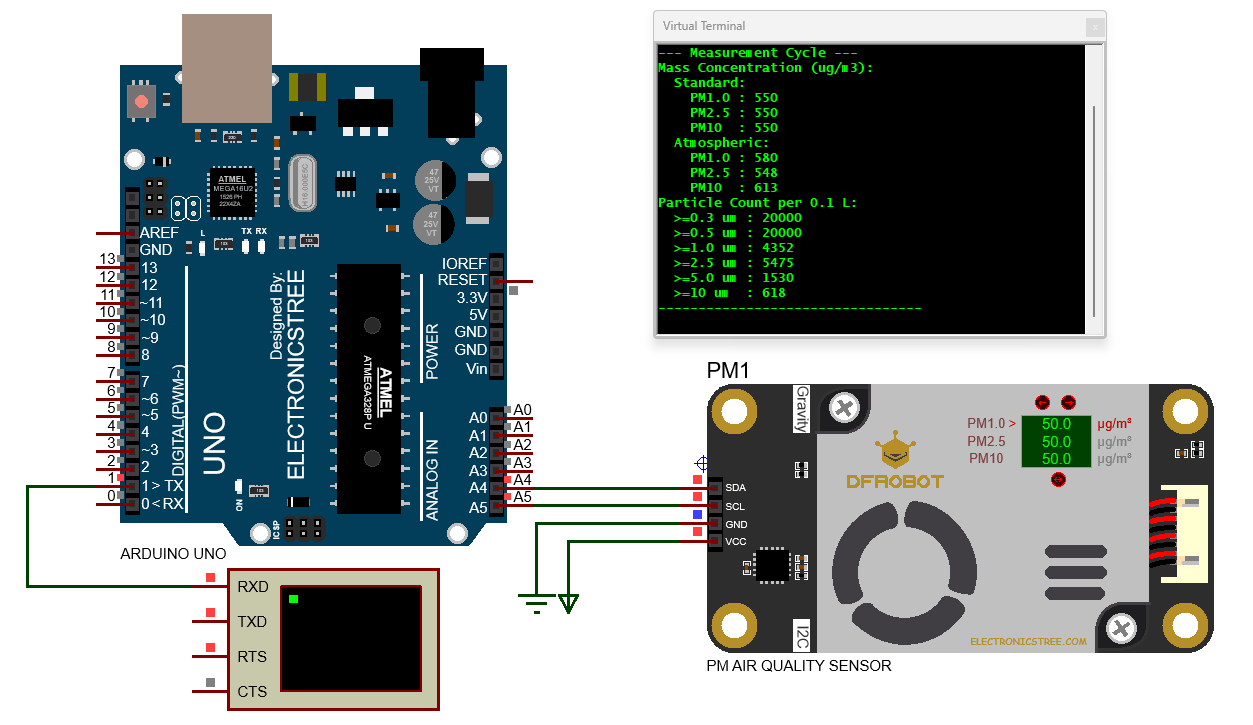
Serial.println(F("--- Measurement Cycle ---"));
/* ---------- Mass Concentrations (µg/m³) ---------- */
// Standard values (factory calibration)
uint16_t pm1_0_std = pmSensor.gainParticleConcentration_ugm3(PARTICLE_PM1_0_STANDARD);
uint16_t pm2_5_std = pmSensor.gainParticleConcentration_ugm3(PARTICLE_PM2_5_STANDARD);
uint16_t pm10_std = pmSensor.gainParticleConcentration_ugm3(PARTICLE_PM10_STANDARD);
// Atmospheric environment values
uint16_t pm1_0_atm = pmSensor.gainParticleConcentration_ugm3(PARTICLE_PM1_0_ATMOSPHERE);
uint16_t pm2_5_atm = pmSensor.gainParticleConcentration_ugm3(PARTICLE_PM2_5_ATMOSPHERE);
uint16_t pm10_atm = pmSensor.gainParticleConcentration_ugm3(PARTICLE_PM10_ATMOSPHERE);
Serial.println(F("Mass Concentration (ug/m3):"));
Serial.println(F(" Standard:"));
Serial.print(F(" PM1.0 : ")); Serial.println(pm1_0_std);
Serial.print(F(" PM2.5 : ")); Serial.println(pm2_5_std);
Serial.print(F(" PM10 : ")); Serial.println(pm10_std);
Serial.println(F(" Atmospheric:"));
Serial.print(F(" PM1.0 : ")); Serial.println(pm1_0_atm);
Serial.print(F(" PM2.5 : ")); Serial.println(pm2_5_atm);
Serial.print(F(" PM10 : ")); Serial.println(pm10_atm);
// Particle Counts per 0.1 L
uint16_t cnt_0_3 = pmSensor.gainParticleNum_Every0_1L(PARTICLENUM_0_3_UM_EVERY0_1L_AIR);
uint16_t cnt_0_5 = pmSensor.gainParticleNum_Every0_1L(PARTICLENUM_0_5_UM_EVERY0_1L_AIR);
uint16_t cnt_1_0 = pmSensor.gainParticleNum_Every0_1L(PARTICLENUM_1_0_UM_EVERY0_1L_AIR);
uint16_t cnt_2_5 = pmSensor.gainParticleNum_Every0_1L(PARTICLENUM_2_5_UM_EVERY0_1L_AIR);
uint16_t cnt_5_0 = pmSensor.gainParticleNum_Every0_1L(PARTICLENUM_5_0_UM_EVERY0_1L_AIR);
uint16_t cnt_10 = pmSensor.gainParticleNum_Every0_1L(PARTICLENUM_10_UM_EVERY0_1L_AIR);
Serial.println(F("Particle Count per 0.1 L:"));
Serial.print(F(" >=0.3 um : ")); Serial.println(cnt_0_3);
Serial.print(F(" >=0.5 um : ")); Serial.println(cnt_0_5);
Serial.print(F(" >=1.0 um : ")); Serial.println(cnt_1_0);
Serial.print(F(" >=2.5 um : ")); Serial.println(cnt_2_5);
Serial.print(F(" >=5.0 um : ")); Serial.println(cnt_5_0);
Serial.print(F(" >=10 um : ")); Serial.println(cnt_10);
Serial.println(F("---------------------------------\n"));
delay(2000);
}
Download Library
Simply click on the button to download the library. You can refer to this post for instructions on how to install the library in Proteus 8. How to Download and install Library in Proteus (electronicstree.com)
ZIP Password : electronicstree.com
We’re always looking to expand our library collection based on what our community needs. If you’re looking for a specific Arduino module, sensor, or component that we don’t currently offer, we’d love to hear from you!
Reach out to us at help@electronicstree.com with your requests. We prioritize new library development based on community demand, so your suggestion could be our next addition.
Fixing the “External model DLL not found (GLE=0x0000007E)” Error
If you start a simulation and see an error message such as:
or something similar with another DLL name, don’t panic. In most cases the DLL is not really missing. What’s happening is that your system doesn’t have the Visual C++ runtime libraries that the DLL needs in order to run.
The solution is simple. Go to Microsoft’s website and download the latest Visual C++ Redistributable for Visual Studio 2015–2022. You can find it here:
During installation, make sure you install both the x86 (32-bit) and x64 (64-bit) versions. Even on a 64-bit system, some applications depend on the 32-bit runtime, so having both installed avoids errors.
Once the installation is complete, restart your computer. After restarting, try running the simulation again. In most cases the error will disappear and everything will work normally.
Hardware Product Link: https://www.dfrobot.com/product-2439.html

Not working for Proteus 9 64bit even installing Microsoft dependencies. : ( . External model DLL “AQSENSOR.DLL” not found. GLE=0x000000C1.
Proteus 9 actually has two model folders, so specify which one you are trying to put the model files in. Proteus 9 uses different locations for its model folders, and you can find them in the system settings. Locate your ProgramData folder in Windows; there you will find the model folder. Paste the files into that folder.
Even after installing and reinstalling latest Visual C++ Redistributable it shows that error on proteus 9.
Can you explain which error you mean?
External model DLL “AQSENSOR.DLL” not found. GLE=0x000000C1. This one.
External model DLL “AQSENSOR.DLL” not found. GLE=0x000000C1. This one
Actually, all the sensors that had a .dll (i.e. Oxygen sensor, accelerometer) file are not working with proteus 9 if the model files are kept in the model folder that is in this path (C:\ProgramData\Labcenter Electronics\Proteus 9 Professional\Models). So, which folder do I need to keep the .dll file in.