NetIO Server Model
The NetIO Server is basically a digital I/O server model you can use with Proteus simulations. What it does is let you control and keep an eye on digital input and digital output pins, all in real-time, through a simple HTTP API.
What It Can Do
Here’s a quick look at what the NetIO Server offers:
- A built-in HTTP server (it runs on port 8080).
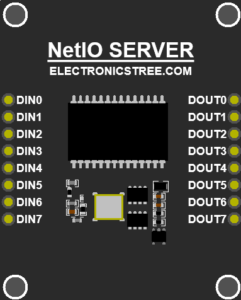
- 8 digital input pins: You’ve got inputs labeled DIN0 to DIN7.
- 8 digital output pins: And outputs from DOUT0 to DOUT7.
- API endpoints for reading (GET) and writing (SET) to the pins.
- JSON responses, which just makes it easier to connect with other software.
- Cross-Origin Resource Sharing (CORS) is enabled, which means you won’t hit typical browser security blocks if you’re building a web app to talk to it.
- There’s also an embedded HTML user interface that it serves up automatically, so you’ve got a visual way to interact with it right away
Accessing the Web UI
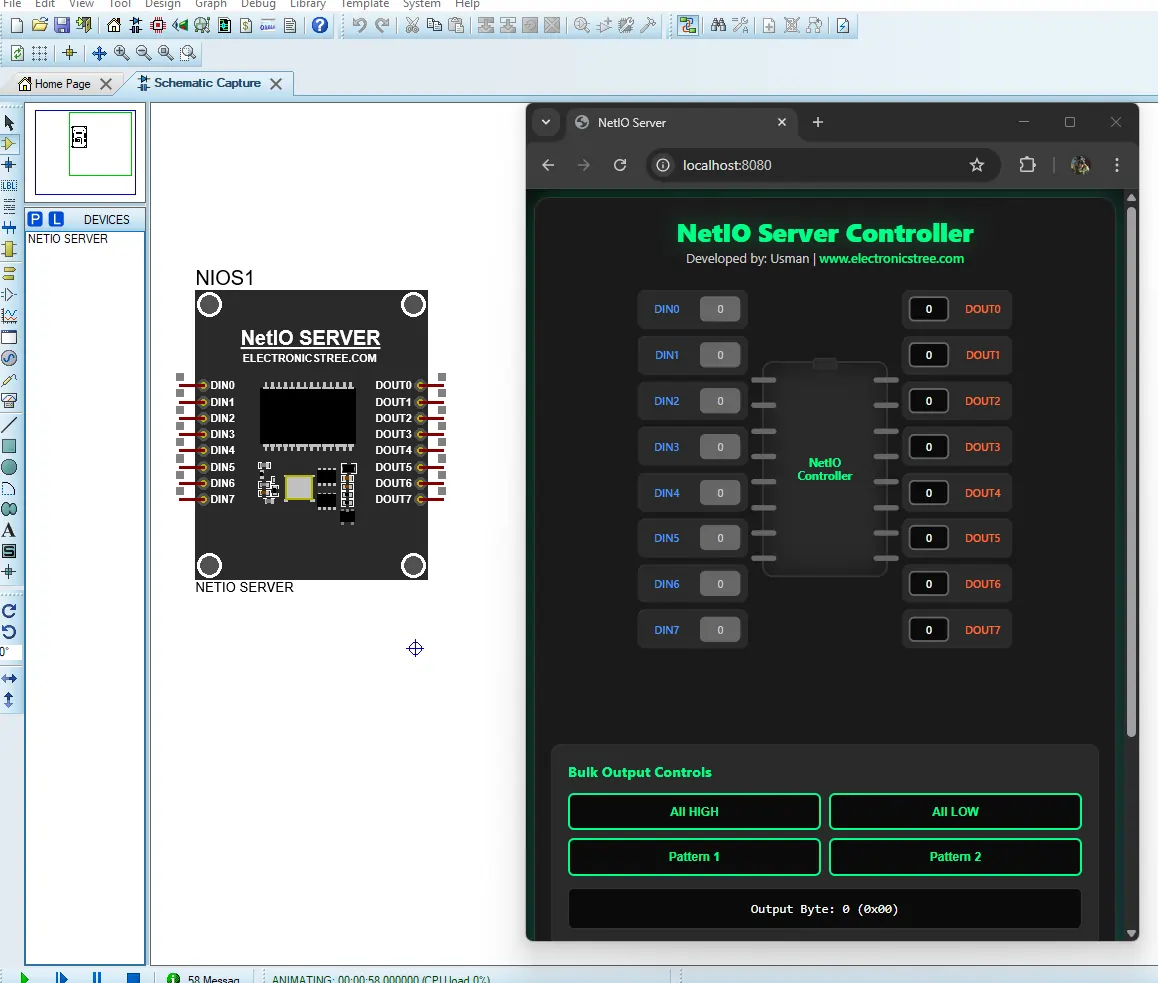
After installing the NetIO Server model, open Proteus, place the model onto the schematic editor, and start the simulation.
Next, open your web browser and go to:http://localhost:8080
If everything is working correctly, a default webpage for the NetIO Controller will appear. This confirms that the model is functioning properly.
At this point, you can stop the simulation, connect the digital input and output pins wherever needed for your project, and then restart the simulation for further testing.
API Endpoints
These API endpoints act as a simple control for your digital inputs and outputs. They let you check the status of your inputs or switch your devices on/off (outputs), giving you easy control over individual connections or everything at once.

What’s an API Endpoint Anyway?
Think of an API endpoint as a doorway to talk to a device or service over the internet, except here, it’s your local machine talking to the VSM NetIO server running on your computer. Instead of a web page showing up, you send requests and get back data or confirmation.
The "Home Address" for Your Requests
All commands start with this base URL: http://localhost:8080
Let’s break that down:
- localhost: your own computer.
- :8080: the port number where your VSM server is listening.
Reading Info from the Device (Digital Inputs)
These are the read-only pins (DIN0 to DIN7). You can’t control them, you’re just checking their current status.
Checking All Inputs at Once: GET /get
Response: { "value": 173 }
What Does 173 Mean? 173 in binary is 10101101. Each digit maps to a pin:
- DIN7 = 1
- DIN6 = 0
- DIN5 = 1
- DIN4 = 0
- DIN3 = 1
- DIN2 = 1
- DIN1 = 0
- DIN0 = 1
Read a Specific Input Pin: GET /get?pin={pin_number} pin_number: 0 to 7 (corresponds to DIN0 to DIN7)
Example: GET /get?pin=4
Response:{ "pin": 4, "value": 0 }
This means DIN4 is currently OFF (0).
Controlling the Device (Digital Outputs)
These are output pins (DOUT0 to DOUT7) that you can control from the API.
Set a Specific Output Pin: GET /set?pin={pin_number}&val={0|1}
- pin_number: 0-7 (DOUT0 to DOUT7)
- val:
- 1 = Turn ON
- 0 = Turn OFF
Example: Turn ON DOUT2: GET /set?pin=2&val=1
Example: Turn OFF DOUT2: GET /set?pin=2&val=0
This turns ON or OFF the third output pin (DOUT2).
Response:{ "pin": 2, "value": 1 | 0 }
GET /set?val={number}This sets all 8 digital outputs (DOUT0 to DOUT7) in one command.
number: Decimal value from 0 to 255, representing the binary states of 8 output pins.
So val=170 (10101010 in binary) will turn ON every even-numbered pin and OFF the rest.
Example: Set All to ON: GET /set?val=255
Testing the API
The NetIO Server responds to standard HTTP GET requests, which means you can test it easily in two ways:
- By typing commands directly into your browser’s address bar, just like visiting any website.
- Or by using simple
curlcommands from the command line for a more scriptable approach.
curl http://localhost:8080/getCheck all input pins using browser : http://localhost:8080/get
Enable Network Access (LAN / Wi-Fi Devices)
If you want to control your NetIO Controller simulation from your phone, tablet, or another computer on the same Wi-Fi, here’s how to set it up step by step. It only takes a couple of minutes.
Let Windows Allow Connections on Port 8080
By default, Windows blocks unknown ports. We need to let it know that port 8080 is safe to use for NetIO.
- Open the Start Menu, search for “Windows Defender Firewall with Advanced Security”, and open it.
- On the left side, click Inbound Rules, then on the right side, click New Rule…
- Select Port and click Next.
- Choose TCP, and under “Specific local ports,” type:
8080 - On the next screen, select “Allow the connection”, then hit Next again.
- Make sure all three profiles (Domain, Private, Public) are checked, then click Next.
- Give your rule a name like:
NetIO Server Port 8080
Click Finish. Done! Now your computer is allowed to accept incoming requests on port 8080.
Find Out Your Computer’s Local IP Address
Next, you’ll need to know your computer’s IP address on your local network.
- Open the Command Prompt (press
Win + R, typecmd, then hit Enter). - Type this and press Enter:
ipconfig - Scroll through the results and look for something like:
IPv4 Address . . . . . . . . . . : 192.168.1.42 - That number (yours may be different) is your local IP address. Write it down, you’ll need it in the next step
Open the NetIO Server from Another Device
Now that everything’s set up, try accessing the server from any other device connected to the same Wi-Fi.
- Open a browser on your phone, tablet, or another PC.
- In the address bar, type the IP address you got earlier, followed by
:8080. For example:http://192.168.1.42:8080 - If everything’s working ,You’ll see the NetIO Server web interface.
Add Your Own Web Page UI to the NetIO Server
Want to build your own custom interface to control your project? You can! The NetIO Server model lets you serve your own HTML, CSS, and JavaScript files right from the simulation, no extra software needed.
What This Means
This feature allows you to design your own web-based control panel (using HTML, CSS, JS) and have it show up when someone visits http://localhost:8080 or your device’s IP on the network.
Folder Structure: Where to Put Your Files
All you need to do is create a special folder named NetIO in the same directory where your Proteus Project file is saved. Inside that NetIO folder, place your web files like this:
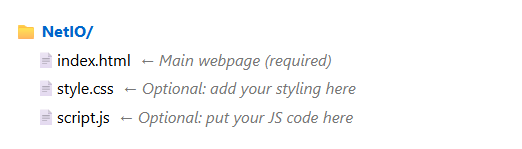
The
index.htmlfile is mandatory — it’s what loads when someone opens the server URL.
If you prefer a single-file setup, you can also just create an index.html that includes all the CSS and JavaScript inline. That works too!
How to Access and Interact with NetIO Server Pins Using HTML and JavaScript
When creating the webpage, you use JavaScript to call the API endpoints, basically sending requests to the URLs like /get or /set, to fetch data (like input pin states) or send commands (like turning output pins ON/OFF).
To read pin values: JavaScript uses fetch() or similar methods to request http://localhost:8080/get or http://localhost:8080/get?pin=3. The server responds with data (JSON) that your script then uses to update the webpage display.
function readInputs() {
  fetch('/get')
    .then(response => response.json()) // Expecting JSON: { "value": number }
    .then(data => {
      const inputValue = data.value;
      console.log(`Received input value: ${inputValue}`);

      // Optional: update UI or state
      // inputState = inputValue;
      // updateDisplay();
    })
    .catch(error => {
      console.error('Error receiving data:', error);
    });
}
To control output pins: When the user clicks a button, JavaScript sends a request like http://localhost:8080/set?pin=2&val=1 to turn that pin ON. The server updates the pin and responds, letting your script update the webpage accordingly.
function sendPinCommand(pin, value) {
  const url = `/set?pin=${pin}&val=${value}`;
  fetch(url)
    .then(response => response.text())
    .then(data => {
      console.log(`Sent to server: pin=${pin}, value=${value}`);
      console.log(`Server response: ${data}`);
    })
    .catch(error => {
      console.error('Error sending data:', error);
    });
}- Incoming data (from server to browser) is JSON.
- Outgoing data (from browser to server) is just URL query text parameters.
So the key steps are:
- Use JavaScript to send HTTP GET requests to the API endpoints.
- Handle the responses (parse the JSON).
- Update the webpage UI based on the response data.
- For outputs, send commands to change pin states, and reflect changes on the page.
Create a Webpage Using the AI
Using the AI is an easy way to create functional, customized webpages without needing deep coding skills. Just describe clearly what you want, get the code from AI, and test it out.
Download Library
Simply click on the button to download the library. You can refer to this post for instructions on how to install the library in Proteus 8. How to Download and install Library in Proteus (electronicstree.com)
ZIP Password : electronicstree.com
If you have any requests for Arduino Module Libraries in Proteus, please leave a comment or message us using the contact form.
Fixing the “External model DLL not found (GLE=0x0000007E)” Error
If you start a simulation and see an error message such as:
or something similar with another DLL name, don’t panic. In most cases the DLL is not really missing. What’s happening is that your system doesn’t have the Visual C++ runtime libraries that the DLL needs in order to run.
The solution is simple. Go to Microsoft’s website and download the latest Visual C++ Redistributable for Visual Studio 2015–2022. You can find it here:
During installation, make sure you install both the x86 (32-bit) and x64 (64-bit) versions. Even on a 64-bit system, some applications depend on the 32-bit runtime, so having both installed avoids errors.
Once the installation is complete, restart your computer. After restarting, try running the simulation again. In most cases the error will disappear and everything will work normally.
