Arduino, known for its simplicity and versatility, is a favored choice among electronics enthusiasts and hobbyists. However, as projects evolve in complexity, maintaining a well-organized and clean code structure becomes essential. One potent feature of the Arduino IDE that greatly aids in achieving this organization is the use of tabs. In this comprehensive guide, we will delve into the effective utilization of Arduino tabs for code organization, demonstrated through the development of a multi-sensor project.
The Project: Integrating HC-SR04, LM35, and PIR Sensors
For the purposes of this guide, we will be working on a project that combines three different sensors:
- HC-SR04 Ultrasonic Sensor: Measures distance.
- LM35 Temperature Sensor: Monitors ambient temperature.
- PIR (Passive Infrared) Sensor: Detects motion.
The overarching goal of the project is to display data from these sensors on a 16×2 LCD screen.
Understanding the Initial Sketch Structure
Before delving into Arduino tabs, let’s examine the initial structure of the Arduino sketch:
While this structure suffices, it can become overwhelming as the project complexity increases. This is where Arduino tabs come into play.
Creating Arduino Tabs for Each Sensor
Let’s initiate the organization process by creating Arduino tabs for each sensor, encapsulating their functionalities in separate classes.
Arduino Tabs: HC_SR04
Create a tab named HC_SR04.h
This tab encompasses a class for the HC-SR04 sensor with functions for setup, loop, and display.
Arduino Tabs: LM35Sen
Create a tab named LM35Sen.h
Similar to the HC-SR04 tab, this one encapsulates the LM35 sensor’s functionalities in a class.
Arduino Tabs: PIRSensor
Create a tab named PIRSensor.h:
The PIRSensor tab encapsulates the PIR sensor’s functionalities in a class.
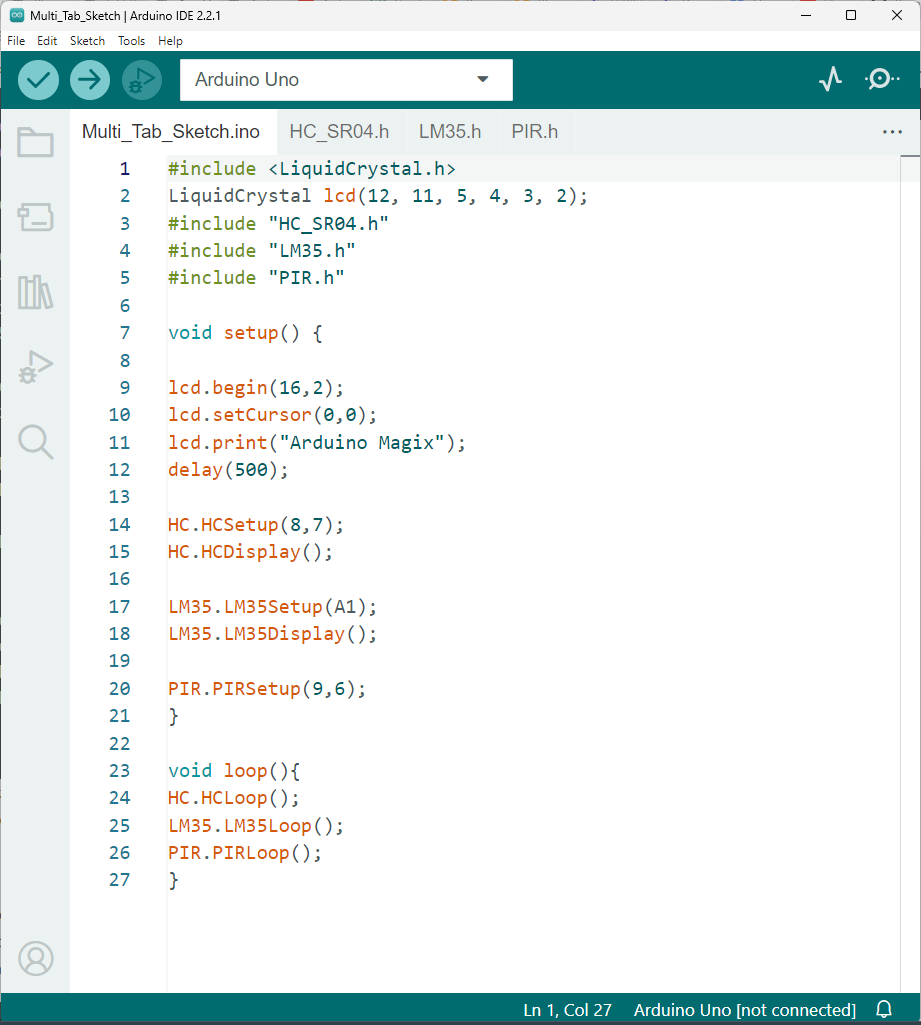
Integrating Arduino Tabs into the Main Sketch
With the sensor code now organized into tabs, the main sketch achieves a much cleaner structure:
This organized approach segregates high-level functionality in the main sketch from the detailed implementation in the sensor tabs.
Conclusion
In this guide, we explored the powerful utility of Arduino tabs for organizing code in a multi-sensor project. By encapsulating each sensor’s functionality in a separate tab, the code becomes more modular, readable, and easier to maintain. This approach proves particularly beneficial as projects grow in complexity.
Download Code
ZIP Password : electronicstree.com
If you have any requests for Arduino Module Libraries in Proteus, please leave a comment or message us using the contact form.