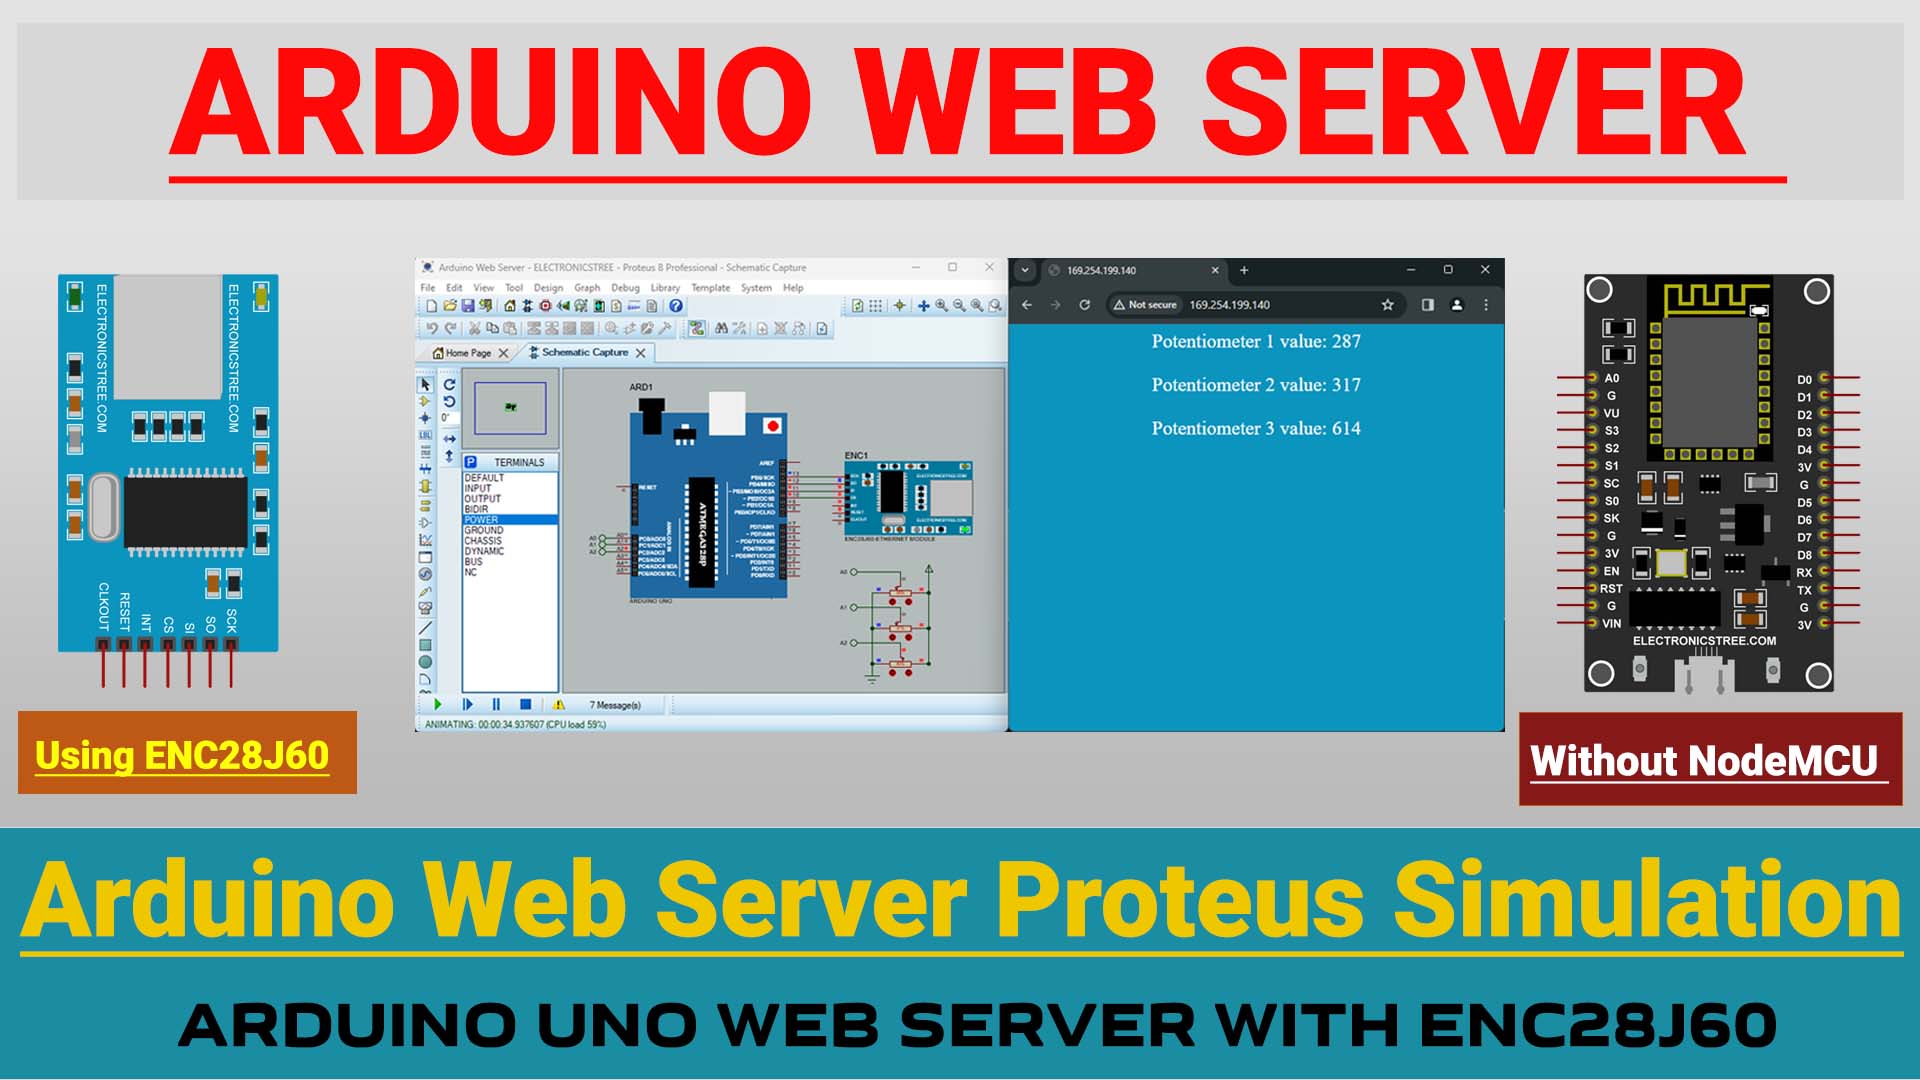
In this post, we will create an Arduino web server using the ENC28J60 within Proteus. Additionally, we will transmit data from Arduino to the webpage and control the LED via the webpage using Arduino.
Arduino Web Server using ENC28J60
In the previous post, we already covered the ENC28J60 Ethernet Module, discussing its purpose and how to integrate it with Arduino in Proteus. If needed, you can refer back to that post.
ENC28J60 Ethernet Module: Arduino Web Server in Proteus with Simplified Setup – Part1
In that discussion, we established an Arduino Web server that serves a static page. Now, in this post, our focus shifts to creating a dynamically generated HTML response page to update Arduino data.
Arduino Web Server : Static vs Dynamic Method
In our previous approach, we used a pre-made HTML page stored in the program memory, which was served for every request. But as we focus on specific tasks, like displaying the potentiometer value, it’s clear our method needs updating.
Instead of using a static HTML page, we’ll create the HTML response dynamically. This means we’ll construct the response on the spot, including the current potentiometer value directly.
This change not only saves memory space in our Arduino but also lets us customize the response as needed. With the potentiometer value embedded in the response, the webpage reflects real-time changes, making our project more responsive and efficient.
Proteus Setup for ENC28J60 Ethernet Module
The ENC28J60 Ethernet Module is designed to interface directly with the Serial Peripheral Interface (SPI) port available on many microcontrollers. Therefore, we will use Arduino SPI pins to connect the ENC28J60.
Arduino Web Server Code : Sending Data from Arduino to Webpage
This code serves a simple webpage that displays the current value of a potentiometer connected to the Arduino. The webpage automatically refreshes every 3 seconds to display real-time updates of the potentiometer value.
Code Explanation
The code above creates a basic web server on the Arduino. It shows a webpage with the potentiometer’s current value. To see this webpage, just type the Arduino’s IP address into a web browser. Now, let’s understand how this Arduino Web Server operates.
How the Arduino Web Server Works
TCP Packet Reception:
- When a TCP packet is received by the Arduino, it contains a payload. In the context of web servers, this payload typically consists of an HTTP request sent by a client (such as a web browser) to the Arduino.
Extracting TCP Payload:
- The
ether.packetLoop()function processes the received TCP packet. It identifies the position of the TCP payload within the Ethernet buffer and returns this position (pos). This position indicates where the payload starts within the buffer.
Generating HTML Response:
- After identifying that a TCP packet has been received and processed, the Arduino constructs an HTML response. This response includes the current value of the potentiometer, formatted as HTML content.
Replacing TCP Payload with HTML Response:
- Once the HTML response is constructed, it is copied into the same memory space previously occupied by the TCP payload. This effectively replaces the content of the TCP payload with the HTML response containing the potentiometer value.
Sending HTTP Response:
- Finally, the Arduino sends an HTTP response back to the client (the device that made the HTTP request). This response now contains the HTML content generated by the Arduino, including the potentiometer value. The response is sent using the
ether.httpServerReply()function, which takes the length of the HTML response as an argument to specify how much data to send.
this process allows the Arduino to act as a simple web server. When a client sends an HTTP request (like accessing a webpage), the Arduino dynamically generates an HTML response containing the current value of the potentiometer and sends it back to the client, effectively displaying the potentiometer value in a web browser or any other HTTP client.
Proteus Simulation
Here are the results of the Proteus simulation. What’s interesting to observe is that any changes made to the potentiometer value within Proteus are instantly reflected in the browser interface as well.
Add CSS styling in the Webpage
You have the option to enhance the HTML response with styling elements like titles, headings, and colors directly within the code. By adjusting the HTML content string, you can incorporate HTML tags to introduce styling features.
Limitations of Basic Arduino Boards Compared to ESP Boards
Basic Arduino boards don’t come with Wi-Fi built-in. To get them connected to the internet, you’ll need to add extra hardware like an Ethernet shield or a Wi-Fi module. That’s why it’s not really fair to compare this Arduino Web Server with the ones on ESP boards. ESP boards are more powerful because they have more memory and speed. So, you can’t do all the cool stuff with Arduino that you can with ESP boards.
To make sure your Arduino runs smoothly, it’s a good idea to avoid using fancy CSS styles on your webpage. That way, you can save memory and make everything run faster.
Adding More Data to The Arduino Web Server
If you want to add more potentiometers to the code, you’ll have to read their values in the loop() function and incorporate them into the HTML response. Here’s how you can adjust the code to include readings from additional potentiometers connected to analog pins A1 and A2.

In the next post, we will demonstrate how to control the Arduino digital pins directly from the webpage. If you have any questions or encounter any issues related to this Arduino Web Server, feel free to ask in the comments section or contact me via the Contact page.
