Introduction to Arduino Web Server in Proteus
This marks the final installment of our series on creating an Arduino web server in Proteus. In the initial segment, we configured ENC28J60 with Arduino in Proteus and established a web server within Proteus to serve a static web page. Following that, we adopted a dynamic approach to serve the web page and transmit data from the web server in Proteus to the client (web browser). Now, in this concluding segment, we will accept commands from the client to control the web server in Proteus. As this is a step-by-step tutorial, I recommend newcomers to refer back to the previous posts for a better grasp of the concepts.
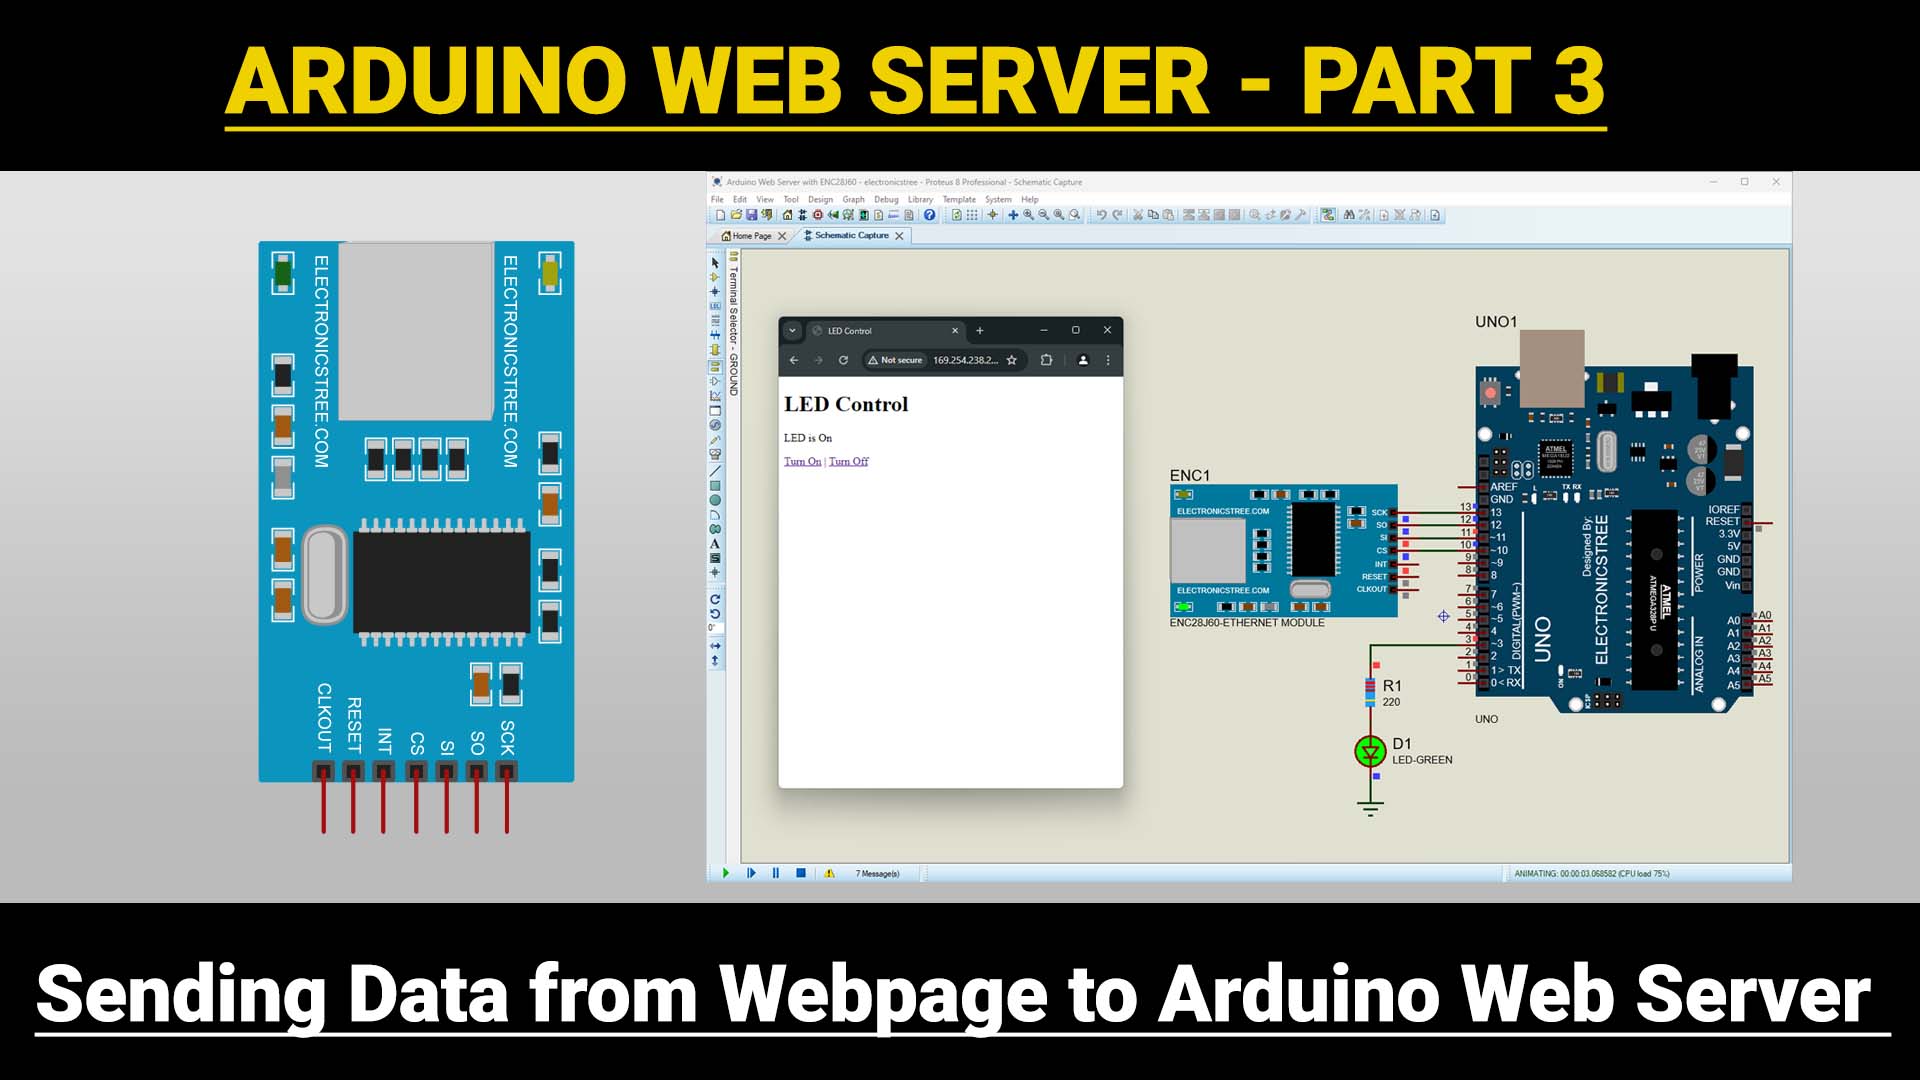
Sending Data from Webpage to Arduino Web Server in Proteus
This code creates a simple web server on the Arduino board that can receive HTTP requests to control an LED. It listens for specific requests, processes them to toggle the LED, and sends an HTML response back to the client indicating the current LED state
Code Explanation
Library Inclusion:
#include <EtherCard.h>
This line includes the EtherCard library, which provides functions for Ethernet communication on Arduino
IP Address and MAC Address Setup:
static byte myip[] = { 169, 254, 199, 140 };
static byte gwip[] = { 169, 254, 199, 139 };
static byte mymac[] = { 0x74, 0x69, 0x69, 0x2D, 0x30, 0x31 };
Here, we set up the IP address (myip), gateway IP address (gwip), and MAC address (mymac) for the Ethernet interface. These values are used to configure the Ethernet connection.
LED Pin and State:
const int ledPin = 3;
bool ledState = LOW;
We define the pin connected to the LED (ledPin) and initialize the LED state (ledState) as LOW (off).
Ethernet Buffer and Initialization:
byte Ethernet::buffer[700];
This line declares a buffer for TCP/IP communication.
Here, we initialize the Ethernet connection using ether.begin. The sizeof Ethernet::buffer specifies the size of the buffer, mymac is the MAC address, and SS is the slave select pin used for SPI communication with the Ethernet module.
ether.begin(sizeof Ethernet::buffer, mymac, SS);
Static IP Configuration:
ether.staticSetup(myip, gwip);
This line configures the Ethernet connection with a static IP address (myip) and gateway IP address (gwip).
Loop Function:
void loop() {
word pos = ether.packetLoop(ether.packetReceive());
if (pos) {
// Process HTTP request
}
}
In the loop function, we continuously listen for incoming packets using ether.packetLoop and process them if a packet is received.
HTTP Request Processing:
char *data = (char *)Ethernet::buffer + pos;
if (strstr(data, "GET /led/on")) {
// Turn LED on
} else if (strstr(data, "GET /led/off")) {
// Turn LED off
}
Inside the packet processing block, you extract the HTTP request data and check if it contains either “GET /led/on” or “GET /led/off”. Depending on the request, you either turn the LED on or off.
HTML Response Generation:
This function constructs an HTML response based on the current LED state (ledState) and sends it back to the client. The response includes the LED state and links to turn the LED on or off.
Web Server in Proteus Simulation
Here are the results of the Proteus simulation. As you can see, the Arduino controls the LED from the webpage. This not only works in Proteus simulation; if you have the actual hardware, this configuration and code will also function the same.
Basic Arduino boards don’t come with Wi-Fi built-in. To get them connected to the internet, you’ll need to add extra hardware like an Ethernet shield or a Wi-Fi module. That’s why it’s not really fair to compare this Arduino Web Server with the ones on ESP boards. ESP boards are more powerful because they have more memory and speed. So, you can’t do all the cool stuff with Arduino that you can with ESP boards.
If you have any questions or encounter any issues related to this Arduino Web Server, feel free to ask in the comments section or contact me via the Contact page.

Good evening. You can do a tutorial on how to create a server with an esp8266
Are you asking to create this ESP web server in Proteus?