Integrating Arduino and Blender for 3D Object Control | Step-by-Step Guide

Integrating Arduino and Blender for 3D Object Control | Step-by-Step Guide

You are currently viewing Integrating Arduino and Blender for  3D Object Control | Step-by-Step Guide

ARDUINO AND BLENDER

The collaboration between Arduino and Blender opens up exciting possibilities for creative projects. If you’re interested in building projects and working with electronics, you’re already familiar with the capabilities of the ESP8266 and Arduino. These platforms provide great power for different project ideas. But have you ever thought of taking things to the next level? Combining these tools with Blender can unlock a world of possibilities. In this blog post, we will explore how to control 3D objects in Blender using the ESP8266 and Arduino. First, we will cover Arduino and Blender, and then we will incorporate ESP8266 with Blender.

Arduino and Blender: Concept

In this demonstration, we are using the LM temperature sensor. Using the Arduino, we will read the values and send them to Blender using the Blendixserial library on the serial channel. In Blender, the Blendixserial add-on will receive the data and animate the 3D object according to the temperature values.

COMPONENTS

Before diving into the technical aspects, let’s briefly introduce the key components involved in this project.

  • Blender The 3D modeling and animation software where we’ll create our 3D objects and scenes.
  • LM35 LM35 is a precision temperature sensor that outputs an analog voltage proportional to the temperature it measures.
  • Arduino The micro controller that will read the values form the LM35 Sensor.
  • Blendixserial A key component of this setup, it is a Blender add-on, and there is also a separate library for Arduino with the same name. If you didn’t know about this amazing add-on and library, check out this video for a clear understanding.

Arduino and LM35 Wiring

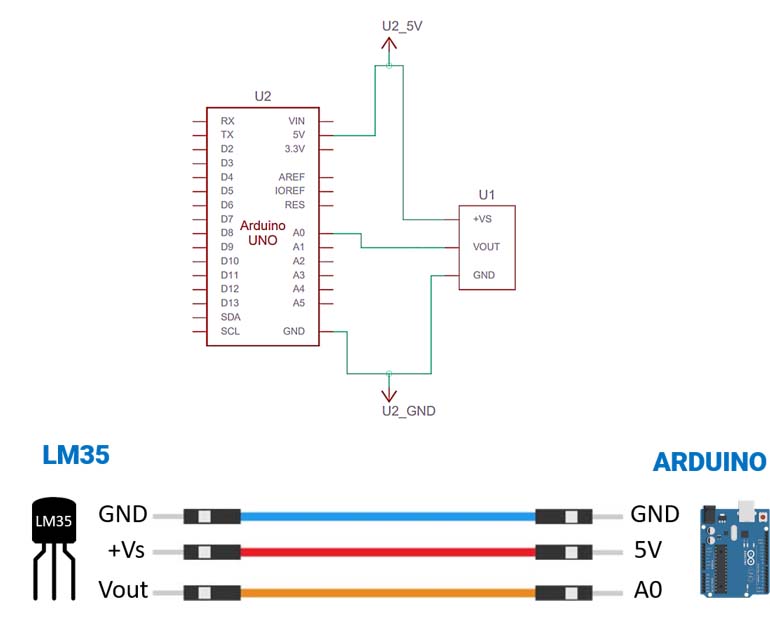
To use the LM35 with an Arduino, follow these steps for proper connections:

LM35 Vcc pin to +5V
The Vcc pin of the LM35 should be connected to the +5V pin on your Arduino. This supplies power to the LM35 sensor so that it can operate correctly.
LM35 GND pin to GND
The GND (Ground) pin of the LM35 should be connected to the GND pin on the Arduino. This creates a common ground reference for the sensor and the Arduino, ensuring they share the same electrical reference point.
LM35 output pin to an analog input pin on the Arduino (e.g., A0)
The output pin of the LM35 is an analog voltage that corresponds to the measured temperature. This output voltage can be read by the Arduino’s analog-to-digital converter (ADC) through one of the analog input pins, such as A0.


Arduino Code

blendixserial Library:

Let’s write the code for Arduino, which reads the data from the LM35 sensor and sends it to Blender using the BlendixSerial library. First, download the library from this
where you can find all the information about this library, including downloading, installation, and usage instructions.

Code with Explanation:

include Library:

First include the blendixserial library which is used to communicate with Blender and control 3D objects.

#include "BlendixSerial.h"
Create Instance:

Create an instance of the BlendixSerial class. This instance will be used to interact with the BlendixSerial library and send data to Blender.

BlendixSerial blendixSerial;
Pin assignment and Serial initialization

Sets the analog input pin A0 as the pin to which the LM35 temperature sensor is connected.

const int lm35Pin = A0;

Initialize the function with a baud rate of 9600.

Serial.begin(9600);
Reading and Conversion of Sensor Value

Reads the analog voltage value from the LM35 temperature sensor connected to pin A0.

int sensorValue = analogRead(lm35Pin);

Converts the analog reading to a voltage value.

float voltage = sensorValue * (5.0 / 1023.0);

Converts the voltage value to temperature in Celsius. The LM35 outputs 10mV per degree Celsius, so multiplying the voltage by 100 gives the temperature in Celsius.

float temperatureC = voltage * 100.0;

Converts the temperature from Celsius to Fahrenheit.

float temperatureF = (temperatureC * 9.0 / 5.0) + 32.0;

Converts the temperature from Celsius to Kelvin.

float temperatureK = temperatureC + 273.15;

Sets the temperature values in Kelvin, Celsius, and Fahrenheit into the BlendixSerial object.

blendixSerial.setCoordinates(1, temperatureK, temperatureC,temperatureF);
Sending data to Blender

Retrieves a formatted output string from the BlendixSerial object. This might involve formatting the temperature values in some specific way for transmission.

String output = blendixSerial.getFormattedOutput();

Send the formatted output to the blender via the serial interface.

Serial.println(output);

Introduces a 1-second delay between temperature readings to avoid rapid, continuous updates.

delay(1000);

Complete Code:

Here is the complete code.

ARDUINO AND BLENDER: BLENDER INERFACE

3D Model:

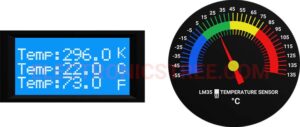
I have created 3D models for a gauge and a digital thermometer.

Arduino and Blender
Blender with Arduino

if you haven’t had any experience with Blender yet, don’t worry! There are plenty of resources available online, including 3D assets stores where you can find pre-made 3D models. You can easily download these models and use them in Blender to enhance your project without the need for complex modeling. However, if you’d prefer to explore your creativity, feel free to create something different that suits your interests.

The key to the Arduino and Blender interface is the BlendixSerial library and addon.

Animation:

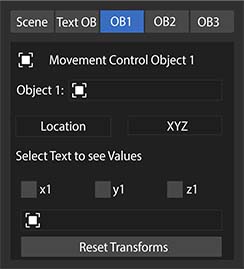
To animate the LM35 sensor data in Blender, select the object which you want animate in my case it’s the gauge needle.

So apply the sensor values to the object’s rotation property along the Y-axis, in your case may axis is different.

And then click on the start button you can see; needle object moves on gauge scale according to the temperature values which we received from the Arduino. as for digital thermometer I have added the text object in the screen so select the text object in the axis text field and the text object will update according to the temperature values. So now, you can easily create different animations using Arduino and Blender integration.

Animation in Blender using blendixserial add-on

The data visualization depends on your Blender skill level. As I’m not a professional 3D artist, the Blendixserial addon I created only manipulates the objects by adjusting their transform properties. It doesn’t involve frame animation. The blendixserial addon uses a timer-based technique to animate objects within the scene. This technique involves registering a timer that calls a specific function repeatedly at regular intervals. You can find all the details in the information page. 

Leave a Reply

This Post Has 2 Comments

  1. Brox

    Hi, how can I send data from Blender to Arduino? I want to control the stepper motor using Blender animations.

    1. Usman

      Soon, I will make updates to the addon for sending data from Blender to Arduino.