When working with IoT devices such as the ESP-01 module, one of the most important features you can use is the ability to communicate with web servers. This is done through an HTTP client, a built-in mechanism that allows your device to send web requests and receive responses from cloud services. Whether you are uploading sensor data, retrieving configuration files, or interacting with online APIs, understanding how this feature works is essential for creating modern and reliable IoT systems
What Is an HTTP Client?
An HTTP client is any device or software component that initiates a communication request to a server using the HTTP or HTTPS protocol. When the ESP-01 sends commands such as GET, POST, PUT, or DELETE through AT+HTTPCLIENT, it operates as a client that communicates with online servers in the same way a web browser or mobile application does.
In the context of IoT, your device acts as a consumer of cloud services. It can retrieve data from APIs, send sensor readings, trigger automation through webhooks, and interact with remote systems. This capability allows a simple microcontroller to become a cloud-aware device that fits naturally into today’s interconnected IoT ecosystems.
Why Your Device Needs HTTP Client Capability
Most IoT products rely on continuous communication with external systems. For example:
- Uploading temperature readings to a cloud dashboard
- Downloading device settings from a configuration server
- Sending a motion alert to a webhook endpoint
- Fetching the current time from an external API
- Uploading logs or status reports to a server
Without HTTP client capability, the device is limited to local-only communication and cannot interact with the broader online world.
How to Use ESP-01
Before we start sending HTTP requests, we must ensure that the ESP-01 is fully connected to the internet. In Proteus, the ESP-01’s hardware and AT command logic are simulated, but the actual network connection comes from Windows, because Proteus uses your PC’s networking system to perform DNS lookups, open sockets, and communicate over HTTP/HTTPS. This means your Windows PC must have working internet access; otherwise, the simulated ESP-01 cannot reach any server.
Inside the simulation, the firmware must also be placed in the correct mode. The ESP-01 must be in STA (station) mode or STA+AP mode, and it must successfully connect to your WiFi network. Only in these modes can the device obtain an IP address, access DNS, and reach external servers. If it is left in AP-only mode or not connected to WiFi, AT+HTTPCLIENT will fail immediately.
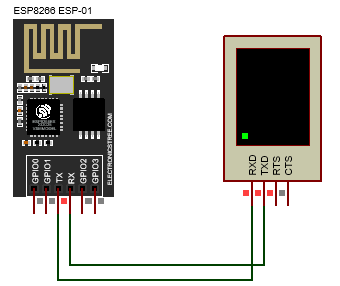
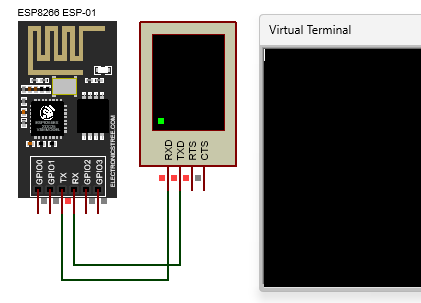
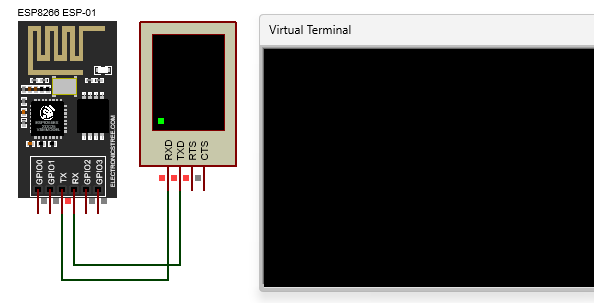
ESP-01 Interface
To communicate with the ESP-01, you can use the Proteus Virtual Terminal, the Arduino Serial Monitor, or any other serial interface. However, the Proteus Virtual Terminal can be somewhat unreliable. If you make a typing mistake, you may notice that the backspace key only corrects the text visually, but the terminal has already sent the incorrect characters to the ESP-01. As a result, any corrected command may still fail because the module received the wrong input, and you will need to type the entire command again.
For more reliable communication, it is usually better to use the Arduino IDE’s Serial Monitor or any external serial terminal tool that properly handles backspace and command editing. You can also use the COMPIM module in Proteus to connect an external terminal application for smoother, error-free communication.
You are free to choose whichever method works best for your setup. In this tutorial, I will use the Virtual Terminal to demonstrate the testing process.
Set WiFi Mode to STA
By default, the firmware sets the ESP-01 to Station mode, so when you run the simulation you don’t need to change any Wi-Fi mode settings manually. You can check the mode using the AT+CWMODE? command, and it will return the current Wi-Fi operating mode of the ESP-01.
Connect to Your WiFi Network
AT+CWJAP="ELECTRONICSTREE","ADMIN"This command only checks whether your PC has an active internet connection. If your PC is connected to the internet, the ESP-01 will return:
WIFI CONNECTED
WIFI GOT IP
This confirms that the ESP-01 has successfully joined your router and now has internet access.
If the connection fails, you will see:
WIFI CONNECT FAILED
FAIL
This indicates that your PC does not have an active internet connection or the network could not be reached.
Using httpbin as a Testing Tool
To test the HTTP client feature, we will primarily use httpbin, an incredibly useful service designed specifically for testing HTTP requests.
What Is httpbin?
httpbin.org is an open-source HTTP testing service created by the popular HTTP client library Requests (Python). It is specifically designed to help developers test:
- HTTP methods (GET, POST, PUT, DELETE, etc.)
- Query parameters
- JSON payloads
- Form data
- Headers
- Status codes
- Authentication
- Delay and timeout behavior
HTTP Client Feature
The ESP module works in client mode when using the AT+HTTPCLIENT command. This command provides all the functionality needed for the ESP to act as a client and communicate with external servers. Let’s explore this command in detail to understand what it does and how it works.
The command:
AT+HTTPCLIENT=<opt>,<contentType>,"<url>","<data>",<transport>
allows the ESP/MCU to make HTTP or HTTPS requests from your AT-command interface.
| Parameter | Required | Description |
|---|---|---|
opt | Yes | HTTP method (1–5) |
contentType | Yes | Request body format (0–2) |
"url" | Yes | Full URL with protocol |
"data" | Optional | POST/PUT request body |
transport | Optional | 1 = HTTP, 2 = HTTPS |
- If
datais not needed, send"" Iftransportis not provided, default = 1 (HTTP)
Supported HTTP Methods (opt)
1. HEAD – Returns only the response headers.
2. GET – Retrieves data from the server.
3. POST – Sends data to the server (e.g., JSON, form data, multipart).
4. PUT – Updates existing data on the server.
5. DELETE – Deletes a resource on the server.
Supported Content Types (contentType)
0 — application/x-www-form-urlencoded
Used for standard text or URL-encoded form data.
1 — application/json
Used for JSON payloads (supports automatic de-escaping).
2 — multipart/form-data
Used for mixed binary/text data.
- Form-data (
contentType=2) is simplified: single-line key=value pairs separated by&. - JSON bodies (
contentType=1) are cleaned automatically (removes extra quotes or escape slashes).
Transport Modes (transport)
| transport | Protocol |
|---|---|
| 1 | HTTP |
| 2 | HTTPS |
Testing the HTTP Client Feature
Now I will explain how the AT+HTTPCLIENT command works on the ESP module and guide you through testing each feature.
Test HEAD Request
A HEAD request is just like a GET request, except it returns only the headers and no body/content. So when you send:
AT+HTTPCLIENT=1,0,"https://httpbin.org/get","",2
Method:       HEAD (1)
Content-Type: form-url-encoded (0, ignored)
URL:          https://httpbin.org/get
Body:         ""
Transport:    HTTPS (2)
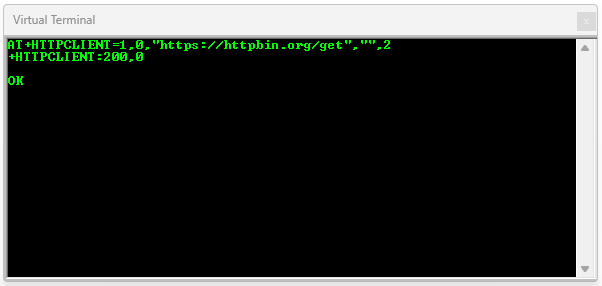
The server responds with status code 200 OK but no response body, because HEAD is designed to return:
- Status code
- Headers
- Content-Length = 0 (because body is not included)
A response code of 200 indicates that the request was successful, while a response of 0 means that no body was returned, which is the expected behavior for a HEAD request. Overall, everything is working exactly as it should.
GET Request
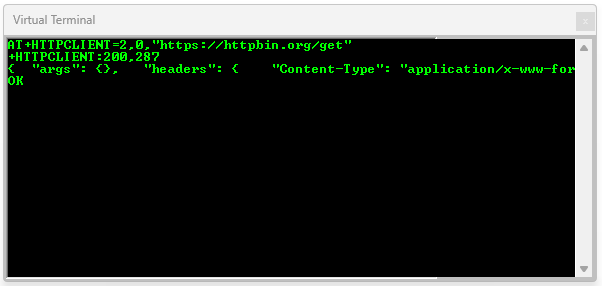
AT+HTTPCLIENT=2,0,"https://httpbin.org/get","",2
Method:       GET (2)
Content-Type: form-url-encoded (0, ignored)
URL:          https://httpbin.org/get
The Virtual Terminal does not display the outputs properly, and you cannot scroll through the results unless you make the terminal full screen. To view the complete response clearly, it is best to copy the output and paste it into Notepad or another text editor. Here is the output you get from this command:
httpbin returned:
+HTTPCLIENT:200,287
{
  "args": {},
  "headers": {
    "Content-Type": "application/x-www-form-urlencoded",
    "Host": "httpbin.org",
    "User-Agent": "ESP-01",
    "X-Amzn-Trace-Id": "Root=1-6923f707-60eae71a2fc389721ecadb69"
  },
  "origin": Public IP",
  "url": "http://httpbin.org/get"
}
OK
The response +HTTPCLIENT:200,287 indicates a successful GET request, with the status code 200 confirming success. The number 287 represents the length of the response body, which is normal for httpbin’s JSON output.
Looking at the JSON body structure, it matches httpbin’s standard format exactly. The "args": {} field shows that no query parameters were sent, while the "headers": {...} field contains the headers that httpbin received. The "origin": "your-public-ip" field correctly reflects your public IP address. The "url": "http://httpbin.org/get" field confirms the requested URL. It is important to note that httpbin always rewrites HTTPS URLs to HTTP in this field, which is normal and not an error.
Finally, your headers appear normal, particularly the User-Agent: ESP-01 header. This confirms that your firmware is correctly sending its custom user agent string.
GET with Query Parameters
AT+HTTPCLIENT=2,0,"https://httpbin.org/get?temp=25&unit=C","",2In this command, the number 2 specifies a GET request, while 0 indicates URL-encoded data, which is ignored for GET requests. The URL "https://httpbin.org/get?temp=25&unit=C" includes the query parameters to be sent. The empty quotes "" represent an empty body, and the final 2 indicates that the request should use HTTPS.
httpbin should reply with something like:
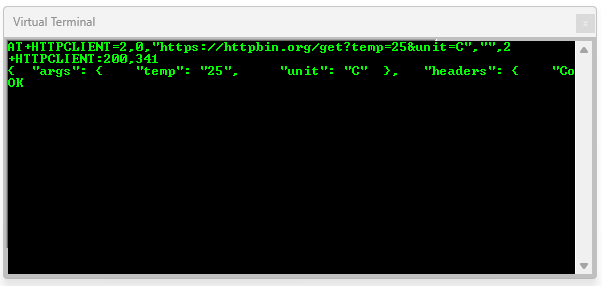
+HTTPCLIENT:200,341
{
  "args": {
    "temp": "25",
    "unit": "C"
  },
  ...
}
OK
The response shows that the query parameters were parsed correctly. Httpbin displays exactly what was sent in the URL, with "temp": "25" and "unit": "C". This confirms that URL parsing works correctly, query parameters are preserved over HTTPS, and the client maintains the string values properly.
Everything else in the response is the same as before. The status code, content length, URL, and headers all match the previous results, confirming consistent and correct behavior from the ESP-01 when handling HTTPS GET requests with query parameters.
POST Form Data
AT+HTTPCLIENT=3,0,"https://httpbin.org/post","temp=30&status=ok",2Method: POST (3)
Content-Type: application/x-www-form-urlencoded (0)
Data: temp=30&status=ok
Transport: HTTPS (2)In this command, the number 3 specifies a POST request, while 0 indicates form URL encoding (application/x-www-form-urlencoded). The data being sent is temp=30&status=ok, and the final 2 indicates that the request should use HTTPS.
httpbin returns:
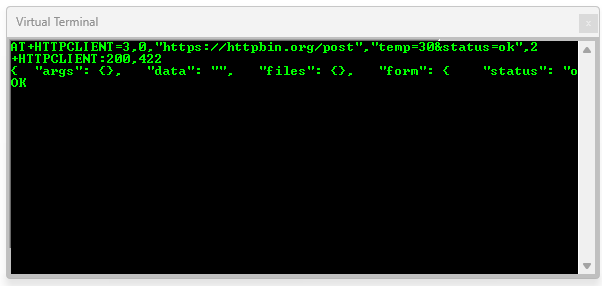
"form": {
  "status": "ok",
  "temp": "30"
}
The form fields in the response show the values you submitted. "status": "ok" and "temp": "30" match exactly what was sent. The Content-Type and Content-Length headers are correctly generated by your client. Everything else in the response remains the same as before, including the headers, URL, and status code formatting.
POST JSON
AT+HTTPCLIENT=3,1,"https://httpbin.org/post","{\"sensor\":\"lm35\",\"value\":28}",2Method: POST (3)
Content-Type: application/json (1)
JSON Data: {"sensor":"lm35","value":28}
Transport: HTTPS (2)
In this command, the number 3 specifies a POST method, while 1 indicates that the content type is JSON (application/json). The data being sent is {"sensor":"lm35","value":28}, and the final 2 indicates that the request should use HTTPS.
httpbin shows:
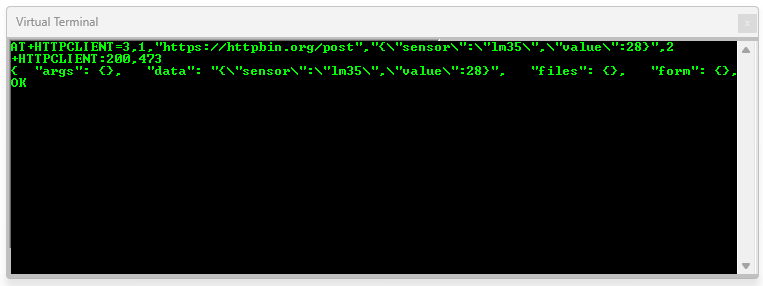
"json": {
  "sensor": "lm35",
  "value": 28
}
This means that the "data" field shows the raw JSON string you sent, while the "json" field displays httpbin’s parsed version, which contains the same values. The headers include Content-Type: application/json and Accept: application/json, and the Content-Length is correct for your JSON payload. Everything else in the response, including the URL, status code, and other headers, remains the same as before.
PUT JSON
AT+HTTPCLIENT=4,1,"https://httpbin.org/put","{\"update\":true}",2Method: PUT (4)
Content-Type: application/json (1)
Body: {"update":true}
Transport: HTTPS (2)
In this command, the number 4 specifies a PUT method, while 1 indicates that the content type is JSON (application/json). The body being sent is {"update":true}, and the final 2 indicates that the request should use HTTPS.
httpbin shows:

"json": {
  "update": true
}
This confirms that your client sends JSON with the correct headers, including Content-Type: application/json and Accept: application/json. The Content-Length matches the size of the payload. The "data" field displays the raw JSON string you sent, while the "json" field shows the parsed version. All other aspects of the response, such as the URL, status code, and additional headers, remain the same as before. HTTP client is now confirmed to handle HTTP PUT with JSON payloads over HTTPS, just like a real IoT device updating configuration on a cloud API.
PUT With Form Data
AT+HTTPCLIENT=4,0,"https://httpbin.org/put","count=10",2
Method:       PUT (4)
Content-Type: application/x-www-form-urlencoded (0)
Data:         count=10
Transport:    HTTPS (2)
In this command, the method is PUT (4), and the content type is set to application/x-www-form-urlencoded (0). The data being sent is count=10, and the transport protocol is HTTPS (2).
httpbin returns:
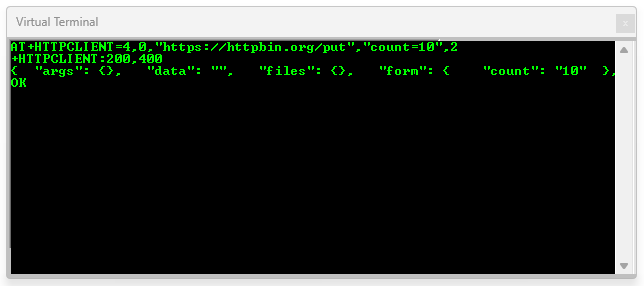
"form": {
  "count": "10"
},
"data": "",
"headers": {
  "Content-Length": "8",
  "Content-Type": "application/x-www-form-urlencoded",
  "User-Agent": "ESP-01",
  ...
},
"url": "https://httpbin.org/put"
The form shows that your data was received correctly. The "data" field is empty because form-encoded requests do not include a raw JSON string. The headers confirm that the Content-Type and User-Agent are correct, and the status code 200 indicates that the request was successful. Everything else in the response, including URL, other headers, and formatting, remains the same as in previous GET and POST tests.
DELETE
AT+HTTPCLIENT=5,0,"https://httpbin.org/delete","",2
Method:       DELETE (5)
Content-Type: form-url-encoded (0, ignored)
Body:         ""
Transport:    HTTPS (2)
In this command, the number 5 specifies a DELETE method, while 0 indicates form URL encoding, which is ignored for DELETE requests. The empty quotes "" indicate that no body is being sent, and the final 2 specifies that the request should use HTTPS.
httpbin returns:

DELETE requests are used to remove resources on a server. While httpbin does not actually delete anything, it will echo back your request, allowing you to verify that your ESP-01 HTTP client sends DELETE requests correctly.
"args": {},
"data": "",
"form": {},
"headers": {
  "Content-Type": "application/x-www-form-urlencoded",
  "User-Agent": "ESP-01",
  ...
},
"url": "https://httpbin.org/delete"
As expected, both the "args" and "form" fields are empty, and the "data" field is also empty because no body was sent. The headers confirm that the Content-Type and User-Agent are correct, and the status code 200 indicates that the request was successfully processed. Everything else in the response remains consistent with previous HTTP methods.
This confirms that DELETE requests are sent correctly over HTTPS, that the ESP-01 HTTP client handles methods with no body properly, and that headers, origin, and URL are transmitted as expected.
Summary
In summary, the ESP-01 HTTP client handles all major HTTP methods, GET, POST, PUT, and DELETE, correctly over both HTTP and HTTPS. It preserves query parameters, sends form or JSON data accurately, and includes the correct headers, status codes, and URLs in each response. The responses are consistent and reliable, confirming that the ESP-01 can function as a fully capable client for cloud communication.
In the next section, we will explore how to use the ESP-01 with platforms like ThingSpeak and Blynk to send and receive real-time IoT data.
Download Library
Simply click on the button to download the library. You can refer to this post for instructions on how to install the library in Proteus 8. How to Download and install Library in Proteus (electronicstree.com)
ZIP Password : electronicstree.com
We’re always looking to expand our library collection based on what our community needs. If you’re looking for a specific Arduino module, sensor, or component that we don’t currently offer, we’d love to hear from you!
Reach out to us at help@electronicstree.com with your requests. We prioritize new library development based on community demand, so your suggestion could be our next addition.


