The SD card module is basically a small breakout board that lets microcontrollers like Arduino, ESP32, or STM32 talk to microSD cards using SPI. It’s super handy for stuff like saving sensor data, handling files, or storing firmware updates in your projects.
The SD card module simulation in Proteus is a virtual component that lets you test and debug microcontroller projects without needing the actual hardware. It mimics the real breakout board’s SPI interface, so you can read/write files on a simulated microSD card, log data, or manage storage right inside the Proteus environment.
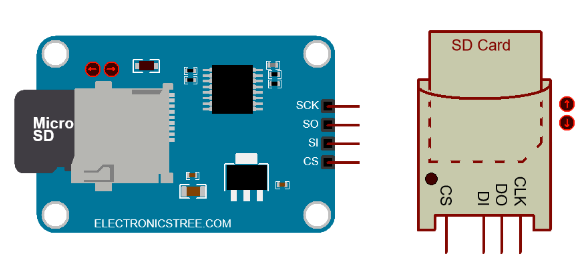
SD Card Module in Proteus
Proteus includes MMC/SD card simulation models with SPI interfaces that can be connected to a variety of microcontrollers. I am using the same SD card model with an updated schematic symbol that I have modified. It works identically to the default Proteus SD card model because it utilizes the same MMC.DLL file. The only difference is the schematic symbol. If you wish to use it, you can download it from the link provided at the end of this post. However, ensure that you select and use only one model at a time, as both share the same properties and specifications. If one is already placed in the editor, selecting the other will replace it
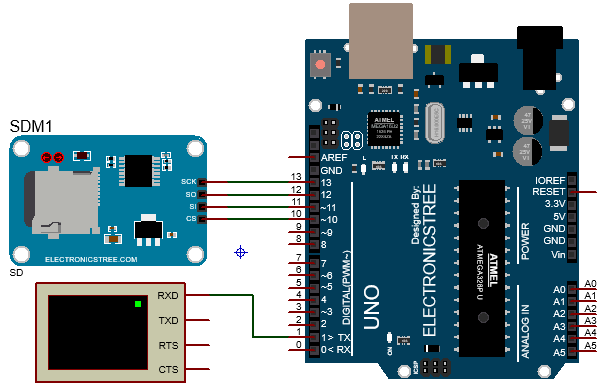
Proteus SD Card Model to Arduino Connections
The hardware SD card module has six pins: two for power (VCC, GND) and four for SPI. The Proteus simulation model uses only the four SPI pins, no power needed. Connect as follows in your schematic:
- SCK → Arduino Pin 13
- SO (MISO) → Arduino Pin 12
- SI (MOSI) → Arduino Pin 11
- CS → Arduino Pin 10 (or any digital pin)
Simple, direct, and ready for testing in Proteus.
SD Card Module Simulation
Step 1: Open the SD Library Example in Arduino IDE
The Arduino IDE already comes packed with awesome built-in libraries, and one of the most useful ones for us today is the SD library. It handles all the low-level communication with the SD card so you don’t have to write SPI commands from scratch.
Here’s what you do:
- Open Arduino IDE.
- Go to File → Examples → SD → CardInfo.
- This example reads basic info from the SD card, perfect for testing if everything is connected right.
Now, edit the code:
- Find the line that says:
const int chipSelect = 4;- Change it to:
const int chipSelect = 10;(We’re using pin 10 as CS because that’s what we connected in Proteus.)
Save the sketch and then compile it. Once it displays “Done compiling”, navigate to the output folder, or simply copy the path directly from the Arduino IDE’s output console if you have verbose mode enabled.
Step 2: Load the HEX File into Proteus Arduino
- In your Proteus schematic, double-click the Arduino Uno component.
- In the Program File field, browse and select the .hex file you just compiled or paste the location you just copied from console.
- Click OK.
Step 3: First Run – Common Error & Fix
Now hit Run Simulation. If you see this error:
Can't create or open card image file: sdcard.mmc
Real Time Simulation failed to start.
Relax, this is super common! Here’s why it happens:
- Proteus needs a virtual disk image (like a fake SD card) to simulate storage.
- It tries to create sdcard.mmc automatically only if the project is saved.
Just save your Proteus project first (.pdsprj). Once saved, Proteus will auto-create the sdcard.mmc file in your project folder. Now run the simulation again.
Step 4: Second Run – “No FAT Partition” Error
Now you might see this in the Virtual Terminal:
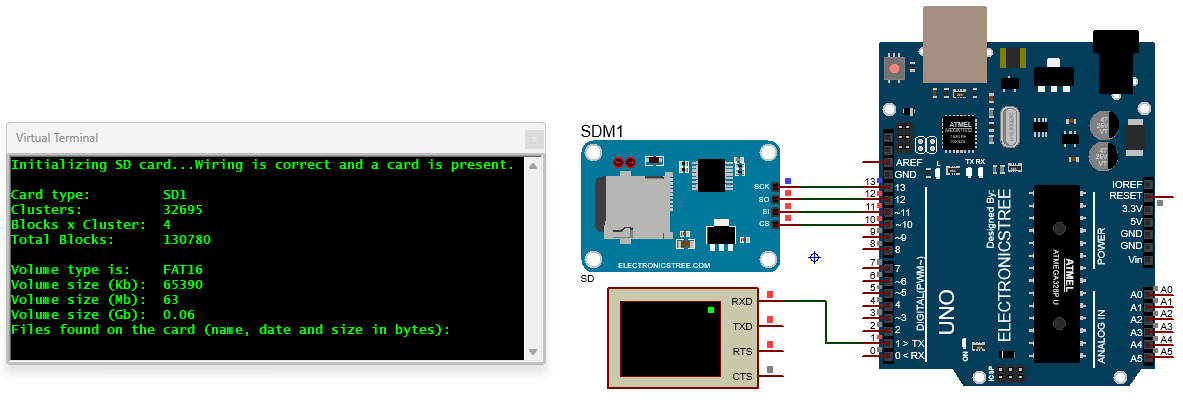
Initializing SD card...Wiring is correct and a card is present.
Card type: SD1
Could not find FAT16/FAT32 partition.
Make sure you've formatted the card.
Great! This means:
- SPI wiring is correct
- CS pin is right
- Card is detected
- But the virtual card has no filesystem
We need to give it a properly formatted disk image with FAT16 or FAT32.
Step 5: Create a Real SD Card Image Using WinImage
WinImage is a powerful Windows tool for creating and editing disk images (supports .ima, .img, .vhd, etc.). Download it from the official website: www.winimage.com.
Create a Formatted Disk Image (Step-by-Step):
- Open WinImage.
- Click File → New…
- Choose “Select custom image format”
- A window pops up with FAT settings.
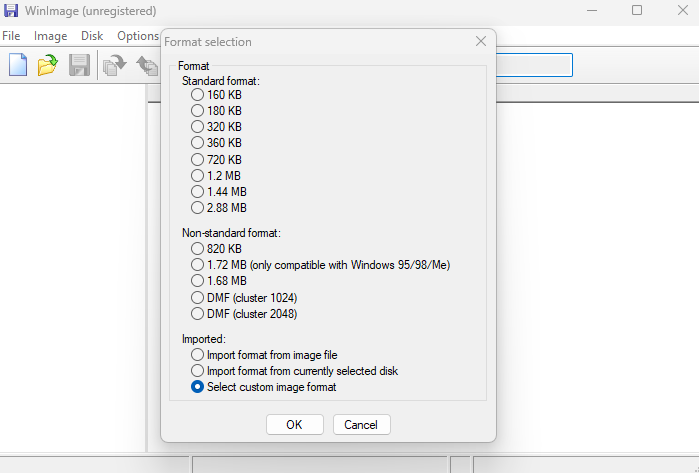
Keep everything default, but change only: Total number of sectors
How to calculate?
Total Sectors = (Desired Size in Bytes) ÷ 512Examples:
| Size | Calculation | Sectors |
|---|---|---|
| 32 MB | 32 × 1024 × 1024 = 33,554,432 ÷ 512 | 65,536 |
| 64 MB | 64 × 1024 × 1024 = 67,108,864 ÷ 512 | 131,072 |
| 128 MB | 128 × 1024 × 1024 = 134,217,728 ÷ 512 | 262,144 |
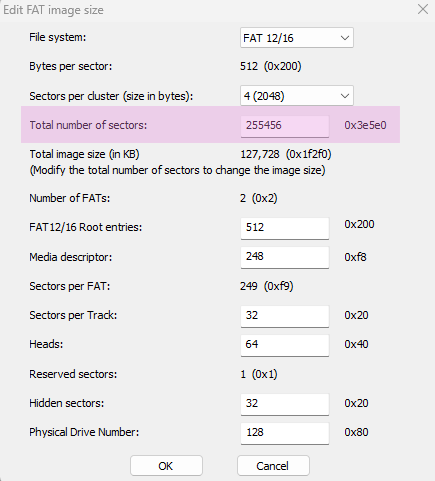
Let’s go with 64 MB and Enter 131072. Click OK, then go to File > Save As…
Save as sdcard.ima (or any name with .ima extension) in your Proteus project folder.
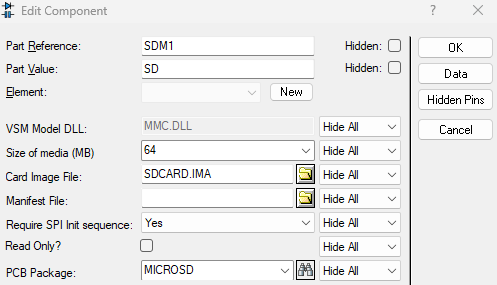
Step 6: Attach the Image to SD Card Module in Proteus
- Double-click the SD Card Module in your schematic.
- In the properties window, find Image File.
- Click the folder icon → browse to your sdcard.ima file.
- Click OK.
Look at the SD card module in Proteus:
- If the microSD card is sticking out (ejected), click the little arrow on the model to push it in.
- It should now look fully inserted.
Click Run again. Now in the Virtual Terminal, you’ll see:
Download Library
Simply click on the button to download the library. You can refer to this post for instructions on how to install the library in Proteus 8. How to Download and install Library in Proteus (electronicstree.com)
ZIP Password : electronicstree.com
We’re always looking to expand our library collection based on what our community needs. If you’re looking for a specific Arduino module, sensor, or component that we don’t currently offer, we’d love to hear from you!
Reach out to us at help@electronicstree.com with your requests. We prioritize new library development based on community demand, so your suggestion could be our next addition.