
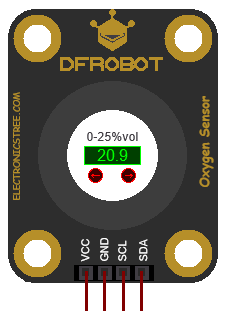
This simulation model is designed to closely reproduce the behavior and functionality of the DFRobot Gravity I²C Oxygen Sensor (SEN0322). This simulation aims to provide the same kind of functionality you’d get from the real sensor, it reads oxygen concentration, reports probe health, supports calibration, and communicates over a digital I²C-like interface.
This model is also part of my ongoing DFRobot sensor simulation series. Previously, I’ve worked on models such as the Ambient Light Sensor, Digital Shake Sensor, Water Pressure Sensor, and Liquid Level Sensor. Each of them is built to behave like their real counterparts, giving developers and learners a way to test firmware or prototype systems even without physical hardware.
The Oxygen Sensor continues that same idea, a reliable, easy-to-understand simulation that behaves realistically and fits smoothly into any embedded or virtual test setup.
Oxygen Sensor Overview
The Oxygen Sensor is a digital simulation model that measures oxygen concentration in the range of 0–25% vol (volume percent).
It provides readings as a 3-byte data output (integer and decimal parts), includes calibration functionality, and indicates sensor life status (“Normal” or “Exhausted”) based on oxygen levels. You can treat it just like a real I²C oxygen sensor, read data registers, send calibration commands, check probe status, and even configure its address or version through simulation properties.
Oxygen Sensor Model Specifications
- Detected Gas: Oxygen (O₂)
- Measurement Range: 0.0% – 25.0% (vol)
- Resolution: Approximately 0.01%
- Accuracy: ±0.1% (simulated)
- Update Rate: Around 1 second
- Probe Life Threshold: Below ~2.5% O₂ = Exhausted
- Interface Type: I²C communication
- Default I²C Address: 0x73
How It Works
The model takes input from the simulation environment (via arrow marker buttons).
This input represents the simulated oxygen concentration, the higher the input value, the higher the measured oxygen percentage, which can then be read through its data registers.
To simulate sensor wear or end-of-life conditions, the model includes a Probe Life flag:
- If the measured oxygen is greater than ~2.5%, the probe status is Normal.
- If oxygen falls below ~2.4%, the probe is considered Exhausted (as if the real sensor has reached its operational limit).
This gives you a realistic way to handle low-oxygen or degraded sensor scenarios in software testing.
Just like the real sensor, the simulation supports two calibration options:
- User Calibration (Register 0x08):
Used to manually adjust the readings based on a known oxygen level (for example, 20.9% in ambient air). - Auto Calibration (Registers 0x0C–0x0D):
Allows writing a 16-bit calibration key for fine-tuning the internal scaling.
After calibration, the sensor will use the new values to refine its readings, exactly as the physical sensor would.
You can change the device address (default 0x73) in the model properties.
- ADDRESS 0 0x70
- ADDRESS 1 0x71
- ADDRESS 2 0x72
- ADDRESS 3 0x73
Register Map
Here’s the Register Information section of the Oxygen Sensor Simulation Model.
- 0x03: Oxygen data (integer part of O₂ concentration).
- 0x04: Oxygen data (first decimal digit of O₂ concentration).
- 0x05: Oxygen data (second decimal digit of O₂ concentration).
- 0x08: User calibration value (manual calibration input, value ×10).
- 0x0A: Calibration key value (low byte).
- 0x0B: Calibration key value (high byte).
- 0x0C: Auto calibration value (low byte).
- 0x0D: Auto calibration value (high byte).
- 0x0E: Probe life status (1 = Normal, 0 = Exhausted).
Using with Arduino
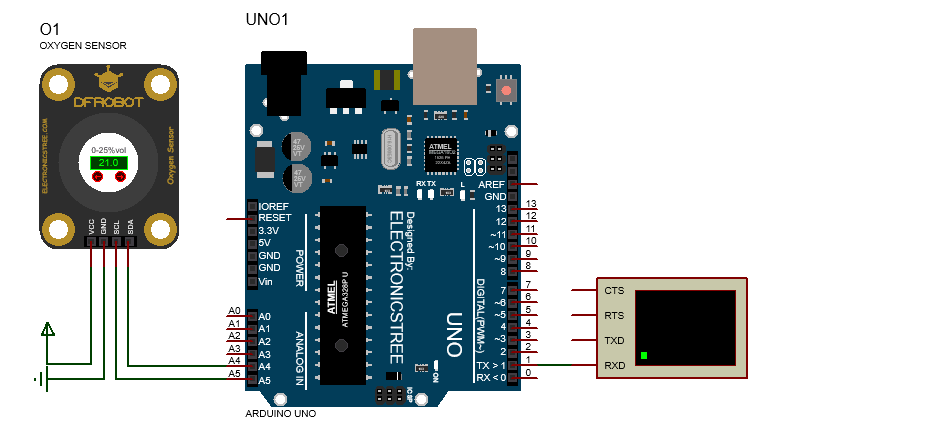
The Oxygen Sensor Simulation Model can be easily interfaced with an Arduino using the official DFRobot Oxygen Sensor Library. Simply connect the sensor’s SDA and SCL lines to the corresponding I²C pins on your Arduino board. Once connected, install the DFRobot Oxygen Sensor Library from the DFRobot GitHub repository. After installation, open the example sketch getOxygenData.ino, compile it, and run it within Proteus to observe the simulated readings.
By default, the example sketch uses #define COLLECT_NUMBER 10 to perform multiple sampling cycles for stable output, but this value can be set to 1 for faster data updates. You can also experiment with other example sketches provided in the library to test calibration functions and probe life status checks, just like with the real DFRobot Gravity I²C Oxygen Sensor (SEN0322).
Download Library
Simply click on the button to download the library. You can refer to this post for instructions on how to install the library in Proteus 8. How to Download and install Library in Proteus (electronicstree.com)
ZIP Password : electronicstree.com
We’re always looking to expand our library collection based on what our community needs. If you’re looking for a specific Arduino module, sensor, or component that we don’t currently offer, we’d love to hear from you!
Reach out to us at help@electronicstree.com with your requests. We prioritize new library development based on community demand, so your suggestion could be our next addition.
Fixing the “External model DLL not found (GLE=0x0000007E)” Error
If you start a simulation and see an error message such as:
or something similar with another DLL name, don’t panic. In most cases the DLL is not really missing. What’s happening is that your system doesn’t have the Visual C++ runtime libraries that the DLL needs in order to run.
The solution is simple. Go to Microsoft’s website and download the latest Visual C++ Redistributable for Visual Studio 2015–2022. You can find it here:
During installation, make sure you install both the x86 (32-bit) and x64 (64-bit) versions. Even on a 64-bit system, some applications depend on the 32-bit runtime, so having both installed avoids errors.
Once the installation is complete, restart your computer. After restarting, try running the simulation again. In most cases the error will disappear and everything will work normally.
