
The ADXL345 is a popular 3-axis accelerometer used for measuring motion and orientation. I’ve created an ADXL345 Proteus library that replicates its key features, such as I²C communication, configurable measurement ranges, and realistic output behavior. It’s designed to help you test and understand how the sensor works, all within Proteus, without using any physical hardware.
What does the ADXL345 Proteus library model do?
ADXL345 proteus library model replicates the key digital functions of the real ADXL345 chip. It communicates over the I²C interface, supports read/write access to all registers, and allows users to configure parameters such as measurement range (±2g, ±4g, ±8g, ±16g) and data format modes.
The model also includes realistic interrupt outputs, internal FIFO behavior, and accurate register mapping, just like the actual sensor. Each axis (X, Y, Z) generates raw acceleration data that can be read through the same register addresses used by the real chip, giving a true-to-life testing experience.
What’s Modeled and What’s Simplified
ADXL345 proteus library fully supports I²C communication, so you can use it with Arduino libraries such as Wire.h or Adafruit_ADXL345. It includes all the main registers (0x00–0x39), and lets you change the measurement range (±2g, ±4g, ±8g, ±16g), bandwidth, and power mode just like the real device. The registers for offsets, data format, and control all work correctly, so your firmware can read and write them normally.
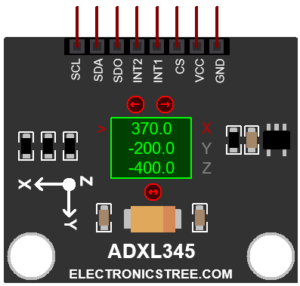
The model also simulates how the sensor gives X, Y, and Z acceleration data. It reads virtual values (from arrow buttons) and converts them into the same type of raw output that the real ADXL345 would produce. These values are stored in the data registers (0x32–0x37) in two’s complement format, so your code sees them exactly as if they came from real hardware.
Since this model focuses on digital simulation, some features of the real ADXL345 aren’t included.
Here’s what’s simplified:
- No tap, double-tap, or free-fall detection
- No true motion physics (the model doesn’t simulate real movement or gravity)
- No temperature dependency
- SPI interface not supported (I²C only)
- FIFO behavior is simplified (no full data buffering)
- Interrupt timing is logical, not real-time
These aren’t limitations for software testing, they just keep the simulation lightweight and efficient.
User Input
The user inputs in this model represent raw sensor data in LSB units, not actual acceleration in g-force.
When you provide values through arrow buttons the model treats them as the digital output of the ADXL345. It then automatically scales and limits these values based on the selected measurement range (±2g, ±4g, ±8g, or ±16g) defined in the DATA_FORMAT register.
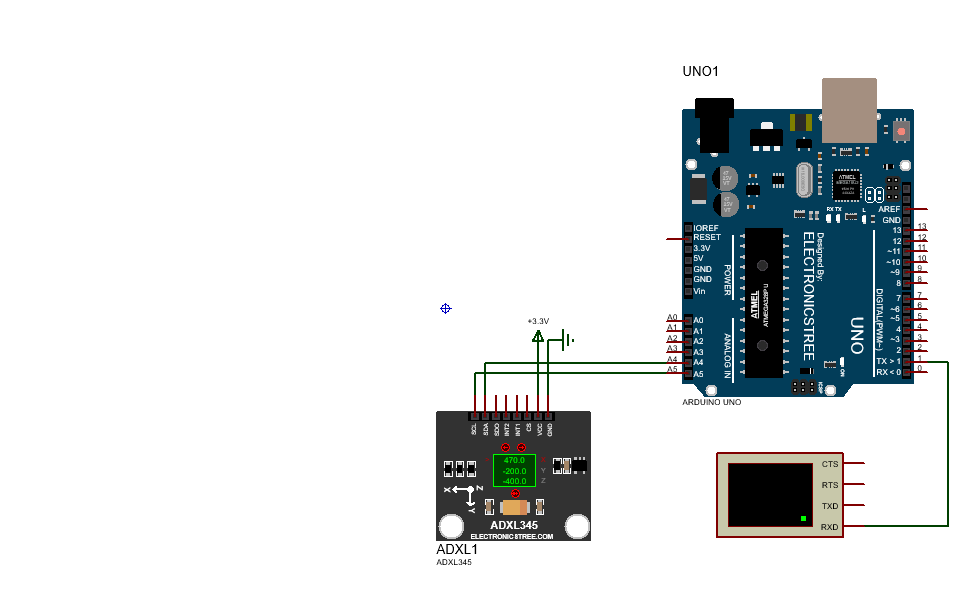
ADXL345 Proteus Library Simulation
You can easily test Adxl345 proteus library model using the Adafruit ADXL345 library in Arduino. Just connect it over I²C in Proteus, load the Adafruit example sketch, and monitor the X, Y, and Z readings in the Serial Monitor. The simulated sensor will respond just like the real ADXL345, perfect for verifying communication, data reading, and range settings before using actual hardware.
Testing Two ADXL345 Sensors with Different I²C Addresses:
You can easily simulate two ADXL345 accelerometers in Proteus by giving each one a different I²C address, just like the real chip! The I²C address depends on the SDO pin level:
- LOW → Address 0x53
- HIGH → Address 0x1D
In the model, you can change this using the “I2C Address” property in the component’s settings, set it to LOW or HIGH as needed.
Once that’s set, you can test both sensors in your Arduino code using the Adafruit ADXL345 library.

Arduino Code:
#include <Wire.h>
#include <Adafruit_Sensor.h>
#include <Adafruit_ADXL345_U.h>

Adafruit_ADXL345_Unified accel1 = Adafruit_ADXL345_Unified(1); //  LOW (0x53)
Adafruit_ADXL345_Unified accel2 = Adafruit_ADXL345_Unified(2); //  HIGH (0x1D)

void setup() {
  Serial.begin(9600);
  if (!accel1.begin(0x53)) Serial.println("Sensor 1 not found!");
  if (!accel2.begin(0x1D)) Serial.println("Sensor 2 not found!");
}

void loop() {
  sensors_event_t event1, event2;
  accel1.getEvent(&event1);
  accel2.getEvent(&event2);

  Serial.print("S1 X: "); Serial.print(event1.acceleration.x);
  Serial.print("  Y: "); Serial.print(event1.acceleration.y);
  Serial.print("  Z: "); Serial.println(event1.acceleration.z);

  Serial.print("S2 X: "); Serial.print(event2.acceleration.x);
  Serial.print("  Y: "); Serial.print(event2.acceleration.y);
  Serial.print("  Z: "); Serial.println(event2.acceleration.z);

  delay(500);
}
Fixing the “External model DLL not found (GLE=0x0000007E)” Error
If you start a simulation and see an error message such as:
or something similar with another DLL name, don’t panic. In most cases the DLL is not really missing. What’s happening is that your system doesn’t have the Visual C++ runtime libraries that the DLL needs in order to run.
The solution is simple. Go to Microsoft’s website and download the latest Visual C++ Redistributable for Visual Studio 2015–2022. You can find it here:
Make sure you install both the x86 (32-bit) and x64 (64-bit) versions. Even on a 64-bit system, some applications depend on the 32-bit runtime, so having both installed avoids errors.
Once the installation is complete, restart your computer. After restarting, try running the simulation again. In most cases the error will disappear and everything will work normally.
Download Library
Simply click on the button to download the ADXL345 proteus library. You can refer to this post for instructions on how to install the library in Proteus 8. How to Download and install Library in Proteus (electronicstree.com)
ZIP Password : electronicstree.com
We’re always looking to expand our library collection based on what our community needs. If you’re looking for a specific Arduino module, sensor, or component that we don’t currently offer, we’d love to hear from you!
Reach out to us at help@electronicstree.com with your requests. We prioritize new library development based on community demand, so your suggestion could be our next addition.
External model DLL “ADXL345.DLL” not found. GLE=0x000000C1. I get this error even though the .dll file is in the (C:\ProgramData\Labcenter Electronics\Proteus 9 Professional\Models) folder. I am on proteus 9 and I have installed both the x86 (32-bit) and x64 (64-bit) versions of the vc_redist.