Hello, Proteus fans! We’re excited to announce that the turbidity sensor Proteus 8 library is finally here. This model has been one of the most requested additions to our Proteus libraries, and we know many of you have been eagerly waiting for it. Now that it’s available, let’s take a moment to explore some key terms and provide a basic overview of this sensor.
Turbidity: What Makes Water Cloudy?
Turbidity is a term that describes how cloudy or murky a liquid is. This cloudiness is caused by tiny particles that you usually can’t see, like:
- Dirt or sediment
- Algae
- Bacteria
- Organic matter
- Other impurities
Checking turbidity is important for things like environmental science and monitoring water quality. If the water is too cloudy, it can indicate pollution or sediment, which can harm fish and make it harder to treat the water properly.
What is a Turbidity Sensor?
A turbidity sensor is a device used to measure how cloudy a liquid, usually water, is. It works by shining a light through the water and checking how much light gets scattered by the tiny particles in it. Basically, when the turbidity is higher, less light gets through, and more light is scattered by those particles.
Turbidity Sensor Proteus Model
I’ve created this model to closely mimic the actual turbidity sensor, giving you both analog and digital outputs. You can easily set the threshold for the digital pin in the properties menu. If the sensor value drops below this threshold, the pin will send a HIGH signal; if it’s above, it will output a LOW signal.

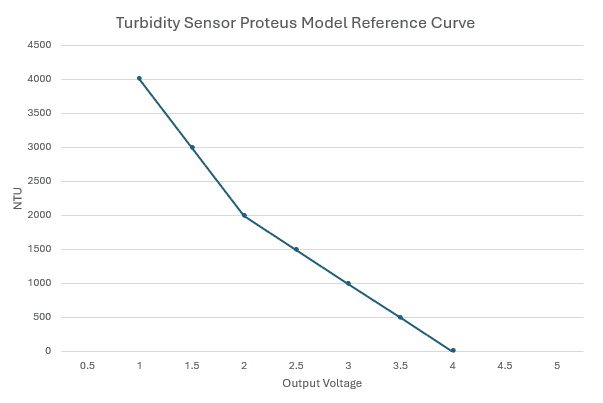
What’s really cool about this model is the interactive animation that’s included! I’ve made the relationship between output voltage and NTU linear, which simplifies the calibration process. When there’s no turbidity detected, the sensor outputs 4 volts, and when the NTU is around 3500 to 4000, it goes down to 1 volt. So, the output range for this sensor is between 4 volts and 1 volt:
- 4V corresponds to 0 NTU (clear water)
- 1V corresponds to 4000 NTU (maximum turbidity)

How to Use it with Arduino
Wiring the Turbidity Sensor to Arduino:
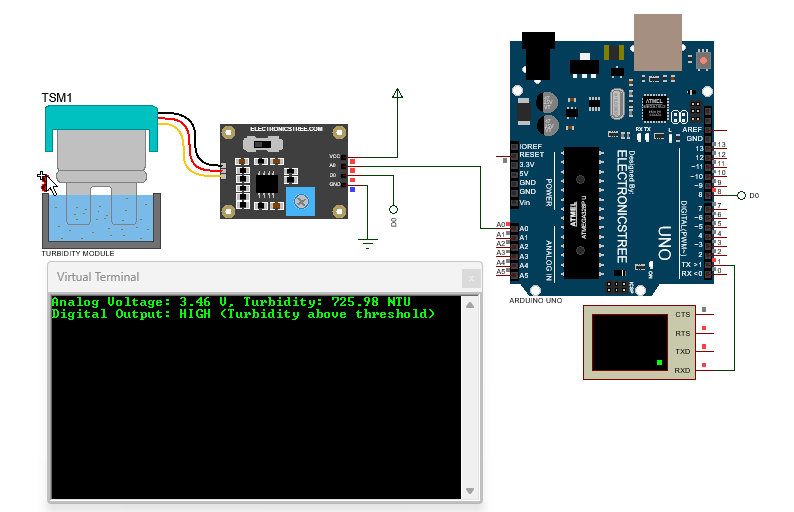
- VCC (Sensor Pin) → Connect to the 5V
- GND (Sensor Pin) → Connect to the GND
- A0 (Analog Output Pin of the Sensor) → A0 (Analog Input Pin of Arduino)
- D0 (Digital Output Pin of the Sensor) → (Connect to any Arduino digital input pin)
Arduino Code
Proteus Simulation

Download Library
Simply click on the button to download the library. You can refer to this post for instructions on how to install the library in Proteus 8. How to Download and install Library in Proteus (electronicstree.com)
ZIP Password : electronicstree.com
If you have any requests for Arduino Module Libraries in Proteus, please leave a comment or message us using the contact form.


hello pls help me to get this library.
rachid akoum
What issue are you facing?
please help to get turbidity libraru for proteuse